March 31, 2012

Card Patterns #159--Sponsored by Designed2Delight

This is my second post of the day.  To see my 12 Kits of Christmas post, click HERE!


Hello Card Patterns fans!  Are you ready for a new sketch?  I think you're going to love this one (but I think that every week!).  We have a fabulous sponsor, Designed2Delight Digital Stamps and Papers, who generously provided the designers with some of their hand-drawn images to use on our cards.  Thanks, Designed2Delight!


I've been trying to use some of the patterned papers I've been hoarding forever, and I knew I had just the right ones to go with this cute strawberry digital stamp.  I printed the berries onto white cardstock and cut them out with an oval die, then colored the image with my Prisma pencils and OMS.

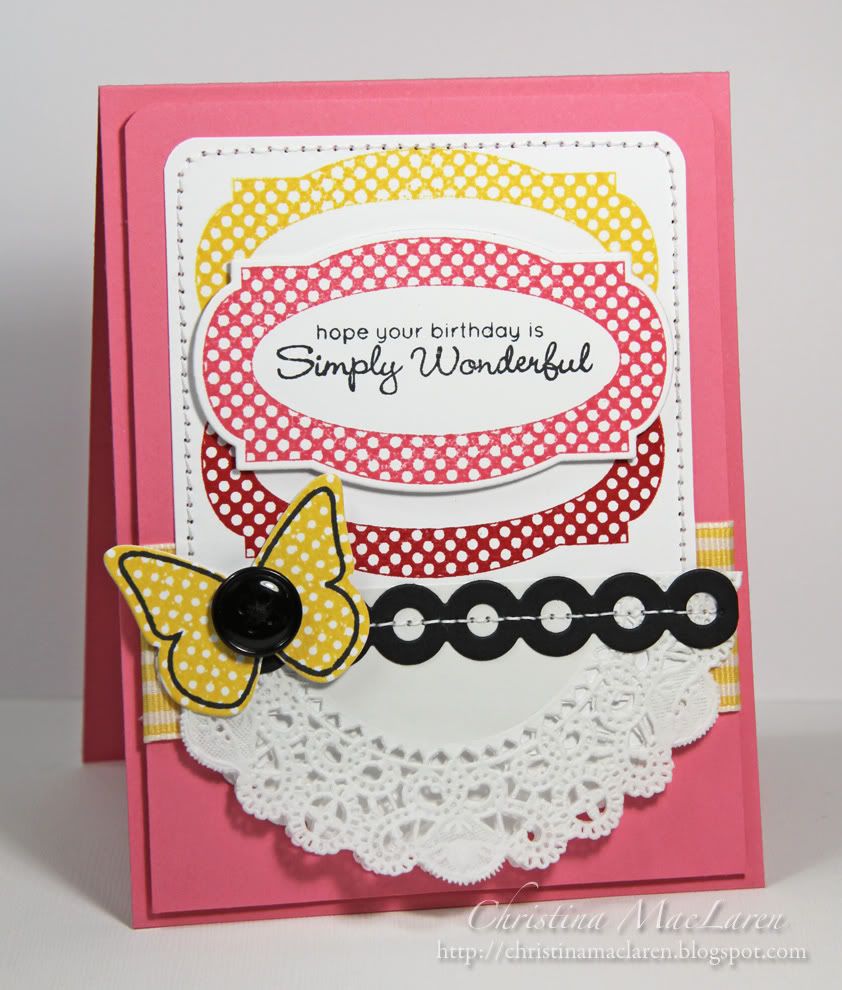
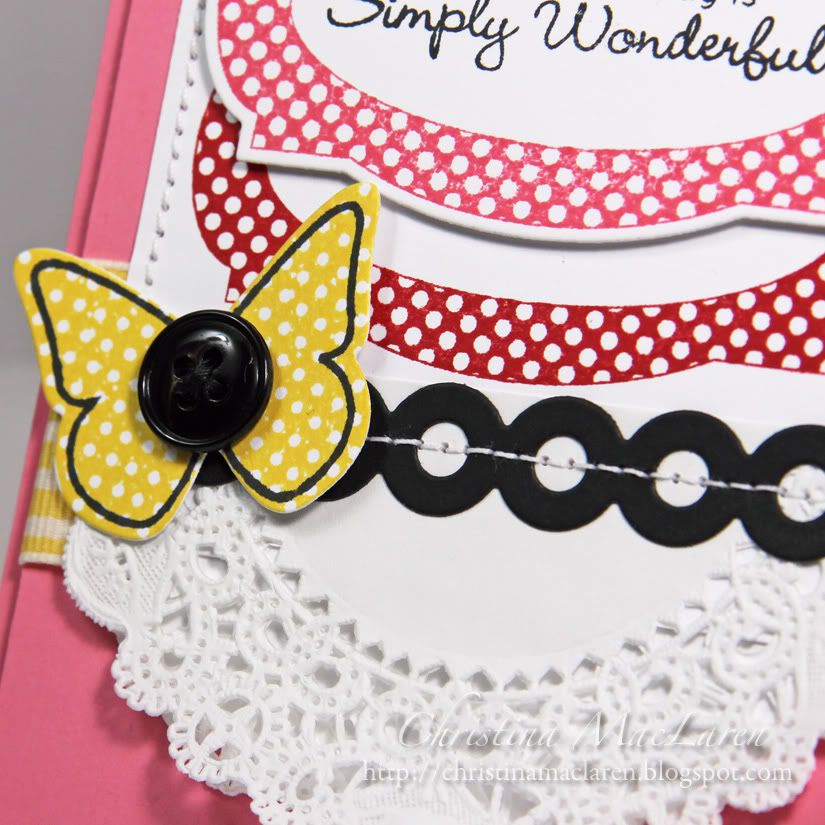
The papers are from an oldie but goodie, Cosmo Cricket's Garden Variety.  Don't you just love the smiling faces on those berries and bees?  I added some twill ribbon, baker's twine, and a trio of red buttons for embellishment and left off the sentiment so this can be an all-purpose greeting.

Cardstock:  Papertrey Ink (Pure Poppy, White)
Patterned paper:  Cosmo Cricket (Garden Variety Mini Deck)
Stamp:  Designed2Delight (Strawberries)
Tools:  Spellbinders (oval die), Fiskars (border punch)
Accessories:  A.C. Moore (ribbon), The Twinery (Maraschino baker's twine), Papertrey Ink (buttons), thread
Coloring medium:  Prismacolor Premier pencils

Hop over to the Card Patterns blog to find out how you can win some digital goodies from Designed2Delight and check out the rest of the DT creations with this week's sketch.

Thanks for visiting today!  

The 12 Kits of Christmas--March


Yes, it's that time again!  The end of each month is quickly becoming one of my favorite times, because I look forward to The 12 Kits of Christmas post.  If you have no idea what this is, feel free to check out my first post from January HERE, but the basic idea is that a group of 12 of us create holiday cards each month using the same kit provided by one of the members.  

This month's kit was put together by my sweet friend, Suzanne of The Card Yard.  It was loaded with goodies, including tons of gorgeous ribbon, a variety of stamped images, pretty papers, and even embellishments.  Here's a peek at some of it (thanks to Kara for the photo!):


I'm embarrassed to say that there were some beautiful stamped images in the kit that I wound up not using, mostly because I wasn't happy with my coloring.  *oops!*  But luckily there were still plenty of beautiful sentiments and images to use.  

The patterned papers in this kit were so lovely, I kept my designs very simple to let them shine.

Cardstock:  Papertrey Ink (Vintage Cream)
Patterned paper:  Stampin' Up! (Holly Berry Bouquet)
Stamp:  A Muse Studio (Vintage Holiday Greetings)
Tools:  A Muse Studio (Vintage Labels 1 die), corner rounder
Accessories:  ribbon, pearls, thread


Cardstock:  Stampin' Up! (Garden Green)
Patterned paper:  Cosmo Cricket (Mitten Weather)
Stamp:  A Muse Studio (Winter Wood)
Tool:  corner rounder
Accessories:  Papertrey Ink (buttons), ribbon (leftover from Feb. kit), Ranger (Diamond Stickles), thread


Cardstock:  Papertrey Ink (Pure Poppy), Stampin' Up! (Garden Green)
Patterned paper:  Stampin' Up! (Holly Berry Bouquet)
Stamps:  A Muse Studio (Vintage Holiday Greetings), Waltzingmouse (Vintage Labels 18)
Tools:  A Muse Studio (Vintage Labels 1 die), Spellbinders (Labels 8), corner rounder
Accessories:  Stampin' Up! (ribbon), pearls, thread


Cardstock:  Papertrey Ink (Kraft)
Patterned paper:  Stampin' Up! (Holly Berry Bouquet), A Muse Studio (Candy Cane Stripe)
Stamp:  A Muse Studio (Vintage Holiday Greetings)
Tools:  A Muse Studio (Vintage Labels 1 die), EK Success (border punch)
Accessories:  thread

I still have tons of supplies left to use on more cards, and I'm sure I'll be CASEing some ideas from my fellow 12 Kit Designers:


Suzanne:  The Card Yard
Kara: KandRDesigns
Sharron: OnPapillionWings
Jeanne: AKeptLife


Be sure to visit all of them for some holiday inspiration--it's never too early to get started on those Christmas cards!

Thanks for your visit!  See you back in a few hours for a new Card Patterns sketch!

March 27, 2012

ColourQ #130


Welcome back!  It's time for a new ColourQ challenge!  How about a spring-inspired color palette to brighten your day?


I kept my card super simple using a set I'd yet to ink up, PTI's Flower Fusion #9.  I lined up the flowers in a row, stamping one in Melon Mambo and the rest in Daffodil Delight.  The centers were stamped off once onto scrap paper to yield a lighter color.

I promised you'd see more of the sentiments from A Muse Studio's Hand Scripted.  The "you" is a separate stamp from the words "are special", but it was incredibly easy to line them up.

I added a Hawaiian Shores mat with a pinked edge at the top and a dotted satin bow.

Cardstock:  Papertrey Ink (Hawaiian Shores, White)
Stamps:  Papertrey Ink (Flower Fusion #9), A Muse Studio (Hand Scripted)
Ink:  Stampin' Up! (Daffodil Delight, Melon Mambo, Certainly Celery), Memento (Tuxedo Black)
Tools:  Fiskars (pinking shears)
Accessories:  Papertrey Ink (ribbon)

Don't forget that you can visit the rest of the ColourQ DT anytime by clicking the links to their blogs over on my sidebar.  They are one talented group!

Thanks for stopping by for a visit!  Have a fantastic day!

March 26, 2012

CAS-ual Fridays #45 and a photo share


Hello, friends!  It's been a few weeks since I had a chance to play along with the CAS-ual Fridays challenge, so I took the opportunity this afternoon to put some ideas to paper.

This week's challenge is to use pastels along with black.  It just so happens that I love the look of aqua, black, and white, so that's where I went with my card.


Not sure if this totally qualifies as clean and simple, since it's a little more technique-y than what I usually do, but I had a lot of fun making it.

First, I stamped the tulip image from Annabelle Stamps Garden Silhouettes several times in Versamark ink onto white cardstock, then heat embossed the images in white.

To create a watercolor effect, I rubbed my Pool Party ink pad directly onto a piece of clear plastic (saved from stamp packaging), spritzed it with water, and used a paintbrush to apply the ink all over the cardstock panel.

Next, I inked up the text background with the Pool Party ink pad and stamped it over the entire panel.  I used a soft cloth to rub the excess ink off of the embossed flowers.

The sentiment is from an A Muse set, Hand Scripted, and I just adore the font, so you'll be seeing it a lot.  And even though these are cling rubber stamps, the labels are already aligned perfectly so you can tell exactly where they'll stamp.  I didn't even need my Stamp-a-ma-jig to get my sentiment lined up perfectly.

The stamped panel was debossed with PTI's Linen & Canvas plate for some subtle texture, then wrapped with black satin ribbon at the top.  A black mat with a scalloped border at the bottom and a sprinkling of gems to highlight the sentiment are the finishing touches.

Cardstock:  Papertrey Ink (True Black, White)
Stamps:  Annabelle Stamps (Garden Silhouettes), A Muse Studio (Hand Scripted), Papertrey Ink (Background Basics:  Text Style)
Ink:  Stampin' Up! (Pool Party), Tsukineko (Memento Tuxedo Black, Versamark)
Tools:  Papertrey Ink (Linen & Canvas impression plate), EK Success (border punch)
Accessories:  Filigree (white embossing powder), Michaels (ribbon, rhinestones)

Are you still with me?  Great!  I promised to share a photo from the Paper Smooches card class I attended on Friday night:


What a treat to meet Kim Hughes and Karolyn Loncon for this fantastic class!  Plus I got to spend some time with my sweet stamping friends Jessica and Suzanne.  Don't we look happy?

Thanks so much for visiting!  See you soon for a new ColourQ challenge!

March 24, 2012

Card Patterns sketch #158--Sponsored by My Favorite Things


Hi there, friends!  I hope you're having a great start to your weekend.  I had a wonderful time last night meeting Kim Hughes and Karolyn Loncon for a Paper Smooches card class in NH!  They were just as sweet as can be, and we made some darling cards with the PS stamps.  I'll be back later this weekend to share some photos!

Today it's time for a new Card Patterns sketch, and this week we're sponsored by My Favorite Things.


I finally ordered some new stamps from MFT last week, but you'll have to wait to see what I got!  For today's card, I used the Polka Dot Greetings stamp set and coordinating die.

I had these colors sitting out on my craft table and thought they made a fun and cheerful combo.  I stamped the polka dot frame in Real Red and Daffodil Delight onto a white panel.  I die cut one more frame and stamped it in Regal Rose with one of the sentiments from the set, then popped it up on foam dots.

I wrapped a piece of wide, striped ribbon around the Regal Rose panel.  At the bottom, I folded a paper doily in half and stitched it in place with a black eyelet border along the top.

To make the butterfly embellishment, I used a PTI die to cut it out from white cardstock, then used a border from Ribbon Tails to stamp each wing with a polka dot pattern.  I added the black outline with a coordinating stamp from Butterfly Dreams and stitched a black button to the center.

Cardstock:  Stampin' Up! (Regal Rose), Papertrey Ink (White)
Stamps:  My Favorite Things (Polka Dot Greetings), Papertrey Ink (Ribbon Tails, Butterfly Dreams)
Ink:  Stampin' Up! (Real Red, Daffodil Delight, Regal Rose), Memento (Tuxedo Black)
Tools:  My Favorite Things (label die), Papertrey Ink (eyelet border die, butterfly die), corner rounder
Accessories:  Wilton (paper doily), Stampin' Up! (ribbon), button, thread

Stop by the Card Patterns blog for details on this week's challenge and prize!

Thanks for visiting today!  Have a good one!

March 20, 2012

ColourQ #129


Welcome back, friends!  It's ColourQ time again!  Yippee!

Check out this week's cool color palette:


I love these colors together, but I struggled in getting it to come together.  The turquoise was really giving me fits!  Hopefully you'll have an easier time of it.

Since receiving PTI's Anniversary set, Pretty Peonies, I've been wanting to play with the big "happy" sentiment that's included.  I stamped it in Wisteria Wonder, then masked the letter "a" and stamped the rectangular frame behind it in Rich Razzleberry.

The small "birthday" sentiment and butterflies are also included in this set.  I stamped one of the butterflies directly in the bottom corner and cut another one out to place on top of the frame.

I added the punched turquoise dots next to the sentiment, then decided they looked out of place with no other turquoise accents.  So I punched scalloped borders to place at the top and bottom of the white panel.  I'm not totally happy with the balance of colors, but I do like the layout.

I gave the white panel some texture using the Linen & Canvas impression plate before popping it up on a Pool Party card base.

Cardstock:  Stampin' Up! (Pool Party, Tempting Turquoise), Papertrey Ink (White)
Stamps:  Papertrey Ink (Pretty Peonies)
Ink:  Stampin' Up! (Pool Party, Wisteria Wonder, Rich Razzleberry)
Tools:  EK Success (border punch), Papertrey Ink (Linen & Canvas impression plate), corner rounder, hole punch

Okay folks, it's your turn!  Stop by the ColourQ blog to check out the rest of the DT samples and link up your creation.

Thanks for visiting today!

March 17, 2012

Card Patterns sketch #157--Sponsored by Sparkle Creations Rubber Stamps


Happy St. Patrick's Day, friends!  Do you have any plans to celebrate today?  Our kids already had a visit from the leprechauns and enjoyed some green pancakes for breakfast.

If you're planning to get crafty today, I hope you'll give the new sketch at Card Patterns a try!  This week we're sponsored by Sparkle Creations Rubber Stamps, who sent the Design Team some of their cute stamps to use on our designs.

I also used the colors for the current CR84FN challenge.


One of the images I was sent to work with was Swimming Lucy, which I thought would work perfectly with these bright colors.  It also explains the "Happy Summer" sentiment in March!

The image is colored with Prisma pencils and adhered to a base of Raspberry Fizz bitty dot patterned paper. 

Cardstock:  Papertrey Ink (Hibiscus Burst, White)
Patterned paper:  Papertrey Ink (2008 Bitty Dot Basics)
Stamps:  Sparkle Creations Rubber Stamps (Swimming Lucy), Papertrey Ink (Tag-its #4)
Ink:  Memento (Tuxedo Black), Stampin' Up! (Melon Mambo)
Tools:  Fiskars (scallop border punch), Papertrey Ink (polka dot impression plate, banner die), corner rounder
Accessories:  ribbon, button, DMC floss
Coloring medium:  Prismacolor Premier pencils

Stop by the Card Patterns blog today to check out the rest of the DT samples and link up your creation for a chance to win this week's prize!

I'm off to catch up on some chores around the house so that I can enjoy the nice weather we're supposed to get tomorrow.  Hope you enjoy your weekend!  Thanks for visiting today!

March 13, 2012

ColourQ #128 & Retro Sketches #2


Hello!  Sorry this post is up late today--I was having some technical difficulties getting my photo uploaded, but all is fixed now.

We're all about the green this week at the ColourQ!  Combining shades of green is always a challenge for me, especially when there are three!  But I got a little help from a sketch on Arielle's new challenge blog, Retro Sketches.  

I know it's hard to tell that all three greens are included, but they are, promise!  This pretty little dandelion stamp is from Annabelle Stamps' Garden Silhouettes.  I stamped it in Wild Wasabi, then added a few dots of Certainly Celery.

The sentiment, tag die, and Sunshine impression plate are from PTI.

Cardstock:  Stampin' Up! (Basic Gray, Garden Green), Papertrey Ink (Vintage Cream)
Stamps:  Annabelle Stamps (Garden Silhouettes), Papertrey Ink (Dot Spot, Signature Greetings)
Ink:  Stampin' Up! (Wild Wasabi, Certainly Celery, Basic Gray)
Tools:  Papertrey Ink (tag die, impression plate)
Accessories:  Stampin' Up! (ribbon)

Sorry to keep this short, but I have to get back to work!  Thanks for stopping by today, my friends!

March 10, 2012

Card Patterns sketch #156


Hello, Card Patterns fans!  A new sketch challenge is up today, and I can't wait to see what you create with it.


This one was quite a challenge for me.  Circles and I don't usually get along, so this sketch was a triple threat!  So it took me a few tries to come up with something that worked, but I think I like it.  *grin*

I started by cutting a circle out of the middle of a square of raindrop patterned paper, then layered the negative cut on a Pure Poppy card base.

I used my Nesties to cut a white square for the center panel and a Harvest Gold circle for the sun, which I trimmed to fit in a corner.  The sentiment, from PTI's Tag-its #3, was stamped directly on the sun in aqua.

I lightly drew sun "rays" with a pencil, then stitched them with yellow floss.  I wrapped the panel with Pure Poppy twill ribbon, adhered it to the card with foam dots, then added a few die cut clouds in the corners.

Cardstock:  Papertrey Ink (Pure Poppy, Harvest Gold, White)
Patterned paper:  My Mind's Eye (Quite Contrary-Jack & Jill)
Stamps:  Papertrey Ink (Tag-its #3)
Ink:  Stampin' Up! (Pool Party)
Tools:  Spellbinders (circle, square dies), Papertrey Ink (cloud dies)
Accessories:  Papertrey Ink (twill ribbon), DMC floss

You can take this sketch in so many directions, as you can see from the rest of the Card Patterns designers.  I hope you'll give it a try!

Thanks for stopping by on your Saturday!  I'm excited to be going to an A Muse workshop put together by my talented friend, Suzanne, today.  What do you have planned?

Have a great weekend, friends!

March 6, 2012

ColourQ #127


Hi there, friends!  You all rocked the palette at the ColourQ last week--what a fantastic gallery!  Be sure to check it out if you haven't already.

Are you ready for a new color challenge?  Take a look at this week's inspiration:


I was happy to have earned enough reward points from Papertrey Ink to qualify for this year's anniversary set, Pretty Peonies.  Love the florals, frames, and butterfly in this set and thought this would be the perfect opportunity to ink them up.

I started by stamping the large open flower across the card front in Calypso Coral, then added the solid leaves in Certainly Celery.  My only complaint about the two-step stamping of this image is that it was hard to space the flowers just the way I wanted them, but otherwise I think they're really lovely.

I used a Spellbinders oval die to deboss a frame directly on the card base.  The decorative frame and butterfly were both stamped and cut out by hand and layered with foam dots.  

To ground the design, I added a strip of Blushing Bride cardstock debossed with a diamond pattern and a scalloped strip of Dark Chocolate cardstock.


The Royal Court Design Team really knocked my socks off this week with their creations, so you'll want to visit the blog to take a peek!

Thanks for stopping by today.  I truly appreciate the time it takes for you to visit and leave a comment!  

Hope you have a fabulous day!

March 3, 2012

Card Patterns sketch #155-Sponsored by DRS Designs


Hello friends!  I have a new Card Patterns sketch to share with you today.  This week we're sponsored again by DRS Designs.  They provided the designers with some cute rubber stamps to use on our projects, and my package of goodies included the Large Beer Mug!


With the upcoming St. Patrick's Day holiday, I couldn't help but think of green beer.  *grin*  But I stopped short of coloring the beer green, and instead made a Wild Wasabi card base stamped repeatedly with the word "cheers".  

I stamped the beer mug onto Rustic White cardstock and colored it with my Prisma pencils.  I cut it out and popped it up with foam dots on a Rustic White circle stamped with a woodgrain "table".

The Garden Green strip is debossed with polka dots (I was thinking of bubbles rising in the mug) and embellished with some brown twine and buttons.

Cardstock:  Stampin' Up! (Wild Wasabi, Garden Green), Papertrey Ink (Rustic White)
Stamps:  DRS Designs (Large Beer Mug), Papertrey Ink (Fresh Alphabet), WPlus9 Design Studio (Woodgrain Silhouettes)
Ink:  Stampin' Up! (Early Espresso)
Tools:  Spellbinders (circle die), Papertrey Ink (Polka Dot impression plate), corner rounder
Accessories:  Papertrey Ink (buttons), Pebbles, Inc. (twine)
Coloring medium:  Prismacolor Premier pencils

I hope you enjoy this week's sketch and will find some time to play along this week!  Thanks again for your visit!
Related Posts Plugin for WordPress, Blogger...