June 29, 2011

Make it Monday #21 & Stamp It Cards week challenge


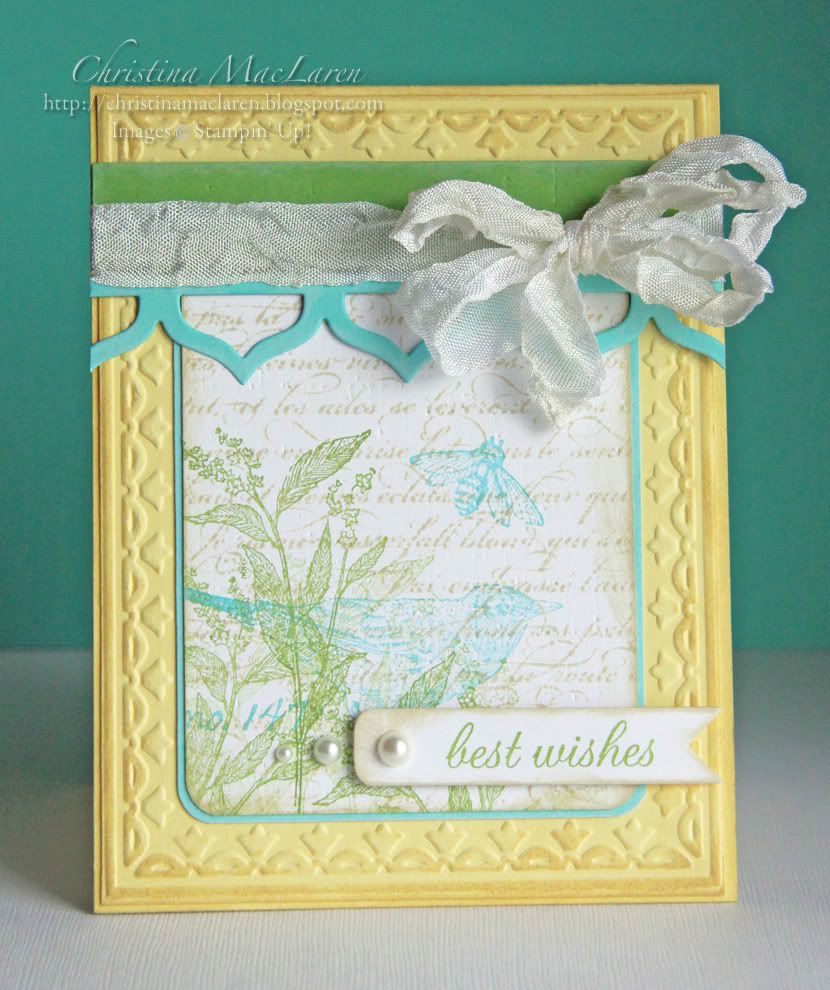
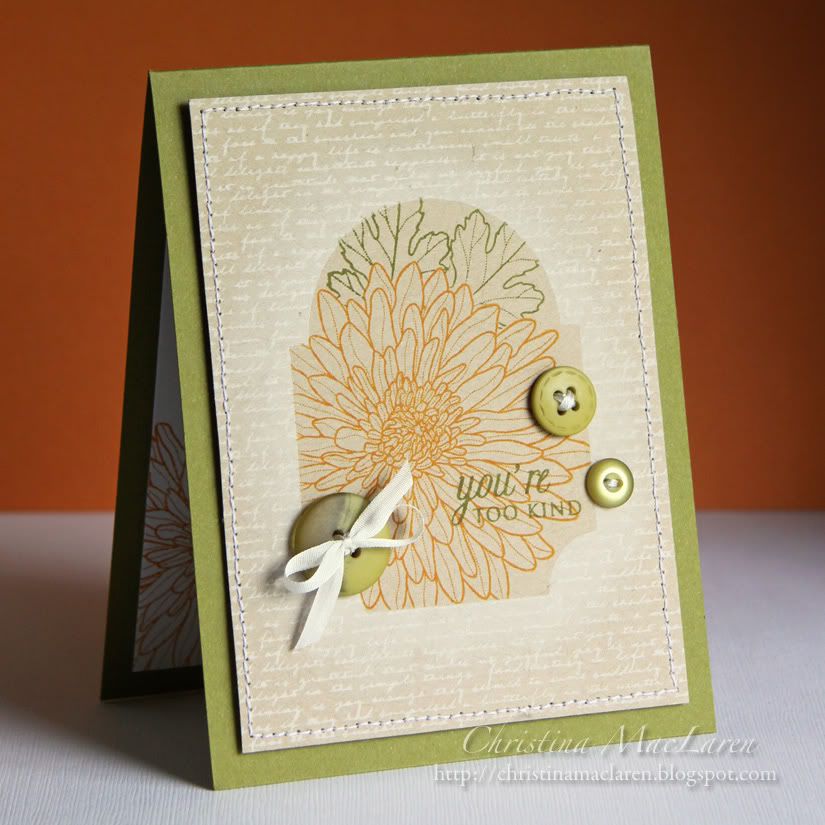
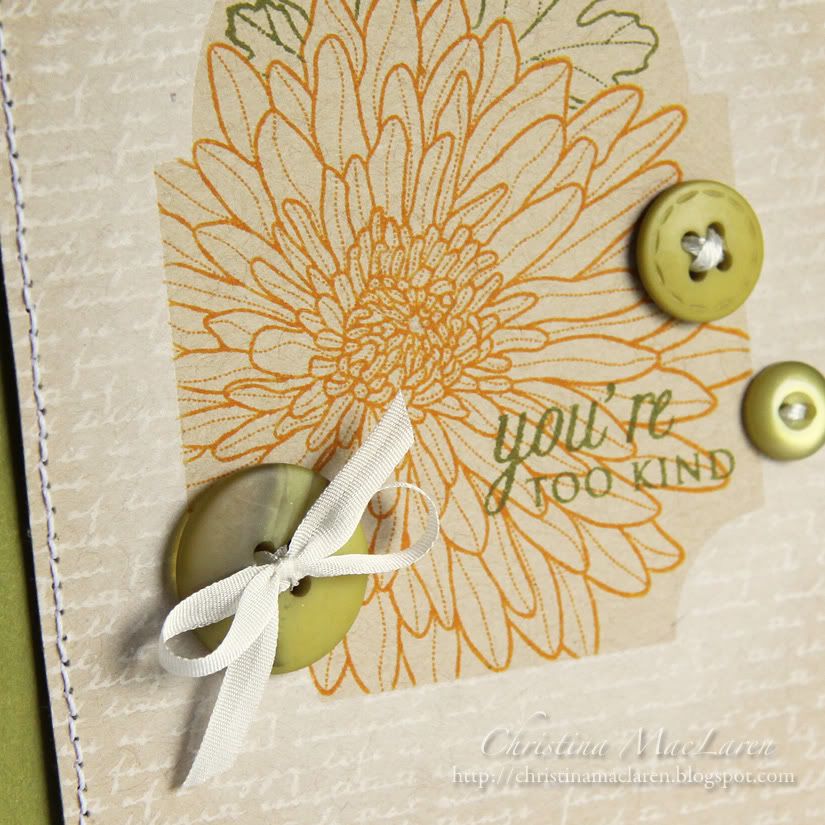
Hello again!  This week is just flying by, and I can't believe July is only 2 days away!  But from the looks of my card, you'd think it was fall!  I decided to play along with the 2 step masking technique showcased by Nichole for this week's Make it Monday challenge.  I'm also entering this card in the Stamp It! Cards week challenge in the Moxie Fab World.


I tried about 5 different ideas for this card before finally settling on this design.  I really wanted to use the Mat Stack 3 shape as my "window", but I didn't have a lot of large images to fill the space, hence the mum in the middle of summer!

After sponging white ink around the edge of mask, I stamped text in white.  To stamp the flower and leaves, I had to do some additional masking to tuck the leaves behind the mum.  The sentiment is from PTI's Mega Mixed Messages.  A few Ripe Avocado buttons frame the sentiment, and some white silk ribbon and white stitching compliment the sponging and background stamping.

All supplies from Papertrey Ink unless noted
Cardstock:  Ripe Avocado, Kraft
Stamps:  Year of Flowers:  Mums, Mega Mixed Messages, Background Basics:  Text Style
Ink:  Spiced Marmalade, Peeled Paint (Ranger), Frost White (Clearsnap)
Tools:  Mat Stack 3 die
Accessories:  Ripe Avocado buttons, white silk ribbon, thread (Coats & Clark)

I wasted a lot of cardstock in the process, but I love the end result.  Definitely a fun technique to add to the stamping bag of tricks!

Have a great day, friends, and thanks for stopping by!

June 28, 2011

ColourQ #91 & JUGS #90


Good morning!  It's Tuesday again, and that means a new ColourQ challenge!  This week's color combo can be found in a super cute plaid dress, perfect for the upcoming July 4th holiday in the U.S.  I used it as inspiration to make a jar lantern for the Just Us Girls challenge to make a 3D project with a patriotic theme.


I couldn't resist creating my own plaid using PTI's Distressed Stripes.  I stamped a panel of cardstock with red, burgundy, and navy plaid, then cut out a circle to fit in the jar lid.  On top of that is Fillable Frames #10 in Basic Gray and a punched circle stamped with Tag-its #4 and Star Prints.  Three gray gemstones add a little sparkle, and some satin Pure Poppy ribbon is wrapped around the lid and tied in a pretty bow.

From the remaining plaid cardstock, I punched six stars.  I glued the stars back to back and embellished each with a white button and gray rhinestone.  Then I threaded the stars with red and white baker's twine and glued them at different lengths from the inside of the jar lid.

My original plan was to put a strand of battery operated white lights in the jar, but I couldn't find any in time.  Guess I'll have to scope them out at Christmas!  So instead I filled the base of the jar with sand and added a battery powered tea light.  It makes a cute little lantern for our deck table!

Cardstock:  Stampin Up! (Basic Gray), Papertrey Ink (white)
Stamps:  Papertrey Ink (Distressed Stripes, Fillable Frames #10, Tag-its #4, Star Prints)
Ink:  Stampin' Up! (Bravo Burgundy), Papertrey Ink (Enchanted Evening), Clearsnap (Cranberry), Versamark
Tools:  Papertrey Ink (Fillable Frames #10 die), EK Success (circle punch), Fiskars (star punch)
Accessories:  The Twinery (baker's twine), Papertrey Ink (ribbon), Michaels (rhinestones), buttons, sand, Ball jar, tealight

Another fun aspect of this project is that it would be easy to change out the decorations for different holidays, since additional lids are inexpensive.


As you can imagine, this was a difficult project to photograph with my limited skills, but I hope you get the idea!

Don't forget to check out the rest of this week's samples by the ColourQ Royal Court DT, then link up your project to be in the running for Colour Queen!

Thanks for stopping by today!

June 27, 2011

The Paper Players #53


Hi there, friends!  How was your weekend?  We had a wonderful time visiting with our friends, and today I'm just sitting on the deck enjoying some gorgeous weather.  Life is good!

I had some time this morning to play along with a challenge blog I've been missing lately, The Paper Players.   This week brings a fun sketch that I just had to try.


I haven't made a baby card in ages, so I brainstormed an idea with this cute little snail from PTI's Baby Button Bits.  I wanted to use the three horizontal panels to show the snail moving along, with the sentiment "Look who has just arrived".

On each white strip, I stamped the snail in chartreuse, then grounded the image with a row of dots from PTI's Faux Ribbon.  I added a butterfly from Butterfly Dreams, then debossed each strip with the Linen & Canvas impression plate.

Next, I stamped the snails in purple onto a scrap of cardstock and cut out just the shells, then adhered them to the green snails.  A strip of purple eyelet border was tucked under the bottom of each strip before attaching them to the purple card base.

To finish off the card front, the last snail was punched out, matted with a chartreuse eyelet circle, and popped up on foam adhesive.  The bottom butterfly is popped up, as well, to draw attention to the sentiment.

All supplies from Papertrey Ink unless noted
Cardstock:  Plum Pudding, Simply Chartreuse, white
Stamps:  Baby Button Bits, Faux Ribbon, Butterfly Dreams
Ink:  Perfect Plum (Stampin' Up!), Moss Green (Clearsnap)
Tools:  Linen & Canvas impression plate, Limitless Layers, Eyelet border die, circle punch (EK Success)

And since I haven't shown you the inside of a card for a while, here's a peek at this one featuring a sentiment from Baby Button Bits (I just didn't ink up the last word, "bee").


I'm off to check out the entries from the last PTI blog hop!  Thanks so much to all of you who stopped by and left comments this weekend.  I'll be coming by your blogs today, if I haven't already!

Have a good one!

June 25, 2011

Papertrey Ink June Blog Hop


Hi friends!  Just popping in quickly with a post for the Papertrey Ink blog hop.  We have friends staying with us this weekend, so my crafting and blogging time is limited, but I didn't want to miss the opportunity to play along with this month's challenge.  

This month's challenge is to use this photo as inspiration:

I immediately thought of THIS card by Jessica Witty using watercolors and knew I wanted to use them to create a rainbow-colored backdrop on my card.  I also spotted the dragonfly hooks on the wall and decided to incorporate the dragonfly stamp from Masculine Motifs.  

I first cut a piece of watercolor paper using Mat Stack 5, stamped the dragonfly with Versamark and heat embossed it with white powder.  Then I used watercolors to create the rainbow background.  Once it was dry, I stamped a sentiment from Signature Series:  Butterfly.

On the card base, I punched a decorative border along the bottom edge and added a white cardstock panel debossed with the Diamonds impression plate.  I used the blue watercolor paint to color some seam binding, let it dry, and tied it around the bottom of the card front.

All supplies from Papertrey Ink unless noted
Cardstock:  white
Stamps:  Masculine Motifs, Signature Series:  Butterfly
Ink:  Versamark, Black (Inkadinkadoo)
Tools:  Mat Stack 5, Diamonds impression plate, border punch (Martha Stewart)
Accessories:  seam binding (Etsy), watercolors (Crayola)

I hope to have some time to hop soon!  Thanks so much for stopping by my blog!  Have a great night!

June 22, 2011

CR84FN32 & Card Patterns 120


Hello friends!  It's a rainy day here, so I turned to the current color challenge at CR84FN for a little sunshine!  These fresh colors are paired up with this week's sketch at Card Patterns.


I've been doing a lot of CAS cards lately, so I felt like going a tiny bit shabby on this one.  I used several stamps from SU's Nature Walk to create a little botanical collage on white cardstock, then stamped French script over the top with Ranger's Antique Linen Distress Ink.  I used PTI's Linen & Canvas impression plate to add some texture to the panel before matting it with Hawaiian shores cardstock.

On the card base is a Lemon Tart panel embossed with Framed Tulips, a gift from my sweet friend Nance.  I added a strip of New Leaf cardstock and a Hawaiian Shores border cut with PTI's Victorian Lace border die.  The wrinkled ribbon was originally white, but I sponged it with Distress Ink to match the sponging on the rest of the card.

For the sentiment, I stamped "best wishes" from PTI's Mat Stack 2 Collection onto a banner, then added a few pearls as accents.

Cardstock:  Papertrey Ink (Lemon Tart, Hawaiian Shores, New Leaf, white)
Stamps:  Stampin' Up! (Nature Walk, En Francais), Papertrey Ink (Mat Stack 2 Collection)
Ink:  Papertrey Ink (Hawaiian Shores), Studio G (green), Ranger (Antique Linen)
Tools:  Stampin' Up! (Framed Tulips embossing folder), Papertrey Ink (Victorian Lace Border die, Double Ended Banner die, Linen & Canvas impression plate), We R Memory Keepers (Corner Chomper)
Accessories:  Michaels (pearls), Prairie Bird Boutique (wrinkle ribbon)

This card will be going out in the mail to a friend who's embarking on a new adventure soon.  Love when I can have a recipient in mind as I create.

Thanks for your visit today!  I hope the sun is shining wherever you are.  Have a good one!

June 21, 2011

ColourQ #90


Good morning!  Happy Summer Solstice to my friends in the Northern hemisphere!

It's time for another fun and challenging color combo from the ColourQ.  This week's red, white and blue palette had me thinking of the upcoming Independence Day festivities in the U.S., but these colors are great for lots of summer projects.


I had to substitute a few colors this week, which is a good reminder to any of you who are thinking of playing--you aren't required to use the exact colors listed, and even if you don't have any Stampin' Up colors, we encourage you to find close matches in your stash and play along!

It's been a while since I made a card with one of these layered labels.  I love playing with combinations of PTI's Mat Stack and Fillable Frames dies to make an interesting focal point.  Here I chose Mat Stack 5 cut from Hawaiian Shores cardstock and debossed with the Book Print impression plate.  On top of that I layered an Enchanted Evening double ended banner.

The scalloped circle frame stamp and sentiment are from Tag-its #4.  I stamped the small star from Star Prints and a small image from Boxes, Bags, & Tags that resembles a burst of fireworks.

The white panel is scored with a diamond pattern using my scoring board and finished off with a few wraps of baker's twine and two turquoise buttons.

Cardstock:  Papertrey Ink (Pure Poppy, Hawaiian Shores, Enchanted Evening, white), Stampin' Up! (Bashful Blue)
Stamps:  Papertrey Ink (Tag-its #4, Star Prints, Boxes, Bags & Tags)
Ink:  Clearsnap (Cranberry), Papertrey Ink (Enchanted Evening)
Tools:  Papertrey Ink (Mat Stack 5, Double ended banner, Limitless Layers dies, Book Print impression plate), EK Success (circle punch), We R Memory Keepers (Corner Chomper), Martha Stewart (Scoring board)
Accessories:  The Twinery (baker's twine), Papertrey Ink (buttons)

I hope you'll play along this week!  Thanks for stopping by and leaving such wonderful comments!  Have a great day!

June 20, 2011

JUGS89 & Pinterest inspired


Hey there, crafty friends!  My week is off to a great start, as I got to spend a lot of time playing with stamps and paper today.  How about you?

I've been contemplating the colors for this week's Just Us Girls challenge, and when I pulled them out I just kept thinking of a rainbow and the way the color blocks in the photo remind me of those rainbow cakes I keep seeing on Pinterest.  Have you seen them?


That's just what inspired today's card.  I used the challenge colors to create blocks of color on a white card base, like the strips of color you see inside the rainbow cake.  Each block is debossed with a different PTI impression plate.

For the cake, I stamped all of the layers from Lawn Fawn's Bake Me a Cake onto white cardstock and cut them out, then colored the cake and stand with Copic markers.  The candles were stamped directly onto the Saffron cardstock before it was debossed.

The sentiment, from Verve's Dream Big set, seemed perfectly appropriate for a birthday cake of this magnitude.

Cardstock:  Stampin' Up! (So Saffron, Riding Hood Red), Papertrey Ink (Simply Chartreuse, Aqua Mist, white)
Stamps:  Lawn Fawn (Bake Me a Cake), Verve (Dream Big)
Ink:  Inkadinkadoo (Black), Copic markers
Tools:  Papertrey Ink (Diamonds, Argyle, Polka Dots, and Book Print impression plates)

I almost gave up on this card halfway through making it, because it just didn't seem "me", but I'm glad I stuck with it.  You can never have too many fun and colorful birthday cards in your stash!

Thanks so much for coming by tonight!

June 19, 2011

Make it Monday #19 & PDCC #86


Hello!  I'm back with a quick and simple card to share before we head out on a Father's Day adventure.  I hope all the Dads in your life have a great day, too!

This card was inspired by this week's Make it Monday challenge from Papertrey Ink to use the rock and roll stamping technique.  I was also itching to use these fun, summery colors from the Play Date Cafe challenge.


I started with a Blueberry sky card base that I cut to 4 in X 5.5 in, to make room for the banner to stick off the side and still fit in an A2 envelope.

I stamped several butterflies from PTI's Butterfly Dreams by inking them first in hot pink and then inking just the outsides of the wings orange.

Once I had the butterflies placed, I wanted a dimensional element so I die cut the larger butterfly from Raspberry Fizz cardstock to layer under a smaller stamped one, wrapped them with floss, and adhered just the body so that the wings can be curled up a bit.


Cardstock:  Papertrey Ink (Blueberry Sky, Raspberry Fizz, white)
Stamps:  Papertrey Ink (Butterfly Dreams)
Ink:  Stampin' Up! (Melon Mambo), Ranger (Spiced Marmalade), Clearsnap (Cyan)
Tools:  Papertrey Ink (butterfly dies), We R Memory Keepers (Corner Chomper)
Accessories:  embroidery floss, thread

Okay, time to get my family moving if we're going to enjoy this beautiful day!  Thanks so much for your visit!

June 18, 2011

Color Cue 16 & CAS-ual Fridays 7

Edited to add:  A few of you suggested that I submit this card to the CAS-ual Fridays color block challenge, so I've updated the post with a link to the challenge.  Thanks, gals!


Hi friends!  I feel like I'm barely coming up for air, I've been so busy lately.  The last week of Kindergarten for my daughter meant lots of school events to attend, plus a birthday party today.  The rest of the month promises to be just as full-to-the-brim, but with fun activities and visits from friends, so I can't really complain!

I have been missing my time in my craft room though, and my time visiting all of you!  I managed to sneak in a card today for Dawn's Color Cue challenge.  I missed out on the last one, so I was determined to finish this one well before the deadline.  You all know how much I love my WPlus9 stamps, right?

This card also qualifies for this week's CAS-ual Fridays challenge to use color blocks.


What a fun and colorful palette!  This design took a few unexpected turns as I worked with it, but I like how it turned out.  I started by cutting small squares of cardstock in Pure Poppy, Plum Pudding, and Hawaiian Shores, then stamped them with a woodgrain pattern from WPlus9's Woodgrain Silhouettes using Versamark and arranged them in a grid.

The leaf image from Woodgrain Silhouettes Additions was stamped in chartreuse ink, cut out and popped up on foam dots.  I like the idea of a grid with one element that breaks free of the boundaries.  The branch left a perfect negative space for the sentiment "Hello", from Spring Post.  I added a double line frame with a black pen and a few buttons to finish it off.

Cardstock:  Papertrey Ink (Pure Poppy, Plum Pudding, Hawaiian Shores, white)
Stamps:  WPlus9 (Woodgrain Silhouettes, Woodgrain Silhouettes Additions, Spring Post)
Ink:  Clearsnap (Moss Green), Versamark, Inkadinkadoo (Black)
Accessories:  Sakura (black pen), Papertrey Ink (buttons)

I hope you're having a wonderful weekend so far!  Thanks for dropping in!

June 15, 2011

Purple dogwood blossoms


Yep, purple dogwood blossoms.  I've never seen any myself, but I had fun using my creative license to color this beautiful image from WPlus9's Flora & Fauna I.  

I had a request from a customer to make a card similar to THIS one, but with a square shape and dogwood blooms in place of the lilac.  She also requested the "miss you" sentiment.  This is the first time I've worked so closely with someone to create a custom card, and I really enjoyed the suggestions and feedback.  I've been feeling a little uncreative lately, so this was a great way to get myself to the craft table with some specific ideas in mind.

Cardstock:  Papertrey Ink (Plum Pudding, Ripe Avocado, white)
Patterned paper:  Papertrey Ink (2008 Bitty Dot Basics)
Stamps:  WPlus9 Design Studio (Flora & Fauna I), Papertrey Ink (Mat Stack 3 Collection)
Ink:  Stampin' Up! (Perfect Plum), Clearsnap (Frost White), Copic markers
Tools:  Papertrey Ink (Linen & Canvas impression plate), Spellbinders (square die)
Accessories:  Queen & Co. (pearls), Michaels (ribbon), Stampendous (embossing powder), thread

Not sure why the flowers look washed out in the first photo.  I get so frustrated with the way they upload into Blogger sometimes, even when they look great in Photoshop.

Thanks for stopping by with your wonderful comments today!  Have a good one!

June 14, 2011

ColourQ #89


Good morning!  I hope your week is off to a great start.  It's time to share a new color challenge for the ColourQ!  If you haven't finished up your Father's Day cards, these colors should get you started.


I can always use a few masculine birthday cards in my stash.  For me, that usually means some woodgrain, a bit of distressing, a strong focal image, and a simple sentiment.

I started with a Bravo Burgundy card base topped with Cajun Craze and PTI's Spring Rain panels.  The blue cardstock is debossed with woodgrain and distressed around the edges.

I stamped a sentiment from PTI's Mat Stack 1 Collection in terracotta ink and added gray stamped lines from Faux Ribbon.  I matted the sentiment strip with Basic Gray cardstock before adhering it to the card.

For the focal image, I die cut and stamped the large maple leaf from PTI's Leaf Prints and adhered it with foam dots.

Cardstock:  Stampin' Up! (Bravo Burgundy, Cajun Craze, Basic Gray), Papertrey Ink (Spring Rain, white)
Stamps:  Papertrey Ink (Leaf Prints, Mat Stack 1 Collection, Faux Ribbon)
Ink:  Clearsnap (Terracotta, Antique Pewter)
Tools:  Papertrey Ink (leaf die, woodgrain impression plate), We R Memory Keepers (Corner Chomper)

I hope you'll play along with us at the ColourQ this week!  Have a good one!

June 13, 2011

I'm back!! And some news to share...

Hi friends!  I just got back from a weekend in the mountains of NH with some wonderful friends.  The weather was terrible, but it didn't matter.  Our friends were like an extension of our family when we lived in Ohio, so we are just grateful that they vacation in New England every couple of years and spend some of that time with us.

One drawback to our time in the mountains was that I only logged onto the internet once over the weekend, so I'm way behind on my reader and blog comments.  I hope to catch up soon!

I thought I'd share a bit of fun news today.  I was contacted by the UK publication Papercraft Inspirations with a request to feature THIS card folder that I originally shared with you here on the blog.  I've got my eye on the newsstand at my local Jo-Ann store to grab a copy when it comes out, but subscribers should be receiving the July issue any day now.  Here's a thumbnail of the cover, in case you're interested in checking it out!


Okay, friends, I am off to catch up on some work before heading to my daughter's school program this afternoon.  Thanks so much for dropping in!

June 9, 2011

JUGS87 & CR84FN31


Hey there!  I have a super quick post to share before I head to bed.  I combined the sketch from Just Us Girls (although I just discovered that the linky expired a few hours ago) with some gorgeous soft colors for this week's CR84FN challenge.


This card was made with my friend Andrea in mind.  She is on the DT for both of these challenge blogs, and she is celebrating her birthday this week.  Not only that, but I received some happy mail from her today in the form of a gorgeous card using PTI's Delightful Dahlia.  So Andrea, this one's for you!

I did some masking to stamp the large dahlia three times in one corner of my Vintage Cream cardstock using SU's Regal Rose ink.  I spritzed the image with Pink Pirouette and Wild Wasabi ink mixed with a little bit of Perfect Pearls for sparkle.  I then stamped a sentiment from PTI's Signature Greetings, added a bit of bling, and adhered the panel to a Wild Wasabi card base.

Cardstock:  Papertrey Ink (Vintage Cream), Stampin' Up! (Wild Wasabi)
Stamps:  Papertrey Ink (Delightful Dahlia, Signature Greetings)
Ink:  Stampin' Up! (Regal Rose, Pink Pirouette, Wild Wasabi)
Accessories:  Michaels (rhinestones), Ranger (Perfect Pearls)

Time to get some sleep!  Thanks so much for sharing part of your day with me, friends!

June 7, 2011

ColourQ #88 & Mojo Monday #194


Happy Tuesday, friends!  How's your week going so far?  I hope you'll have time to play along with this week's ColourQ challenge!  It took me a while to settle on an idea for these colors, but the latest Mojo Monday sketch gave me the direction I needed.  Here's the inspiration:

I recently ordered Verve's Bloom & Grow stamp set, and I just love the layering possibilities for the flowers and the shape of the leaves.  I didn't get the coordinating dies yet, but these were relatively easy to cut out by hand.

I started with a kraft base and layered strips of patterned paper from SU's Neutrals DSP pack, plus a strip of kraft cardstock that I impressed with woodgrain.  The flowers are layered with foam dimensionals over another strip of woodgrain-impressed kraft cardstock, some Early Espresso cardstock cut with PTI's Medium Scalloped border die, and a strip of ribbon (which matches the red ink much better in person).

The sentiment is from Verve's Dream Big, stamped with Early Espresso.

Cardstock:  Papertrey Ink (Kraft, Vintage Cream), Stampin' Up! (Early Espresso)
Patterned paper:  Stampin' Up! (Neutrals DSP)
Stamps:  Verve (Bloom & Grow, Dream Big)
Ink:  Stampin' Up! (Early Espresso), Clearsnap (Chianti), Fiskars (brown), Papertrey Ink (Chai tea dye)
Tools:  Papertrey Ink (Woodgrain impression plate, Medium Scalloped border die)
Accessories:  Michaels (ribbon), thread

I hope you'll play along with us at the ColourQ this week!  As always, the DT has shared some fantastic samples to inspire you, so be sure to check them out and leave them some love.

Thanks for your visit today, friends!  Have a good one!
Related Posts Plugin for WordPress, Blogger...