October 31, 2010

Curtain Call Act 54 & Mojo Monday 162


Welcome back, friends!  It's time for another round of the Curtain Call Color Challenge!  This week Stacey has picked a warm collection of fall hues, based on this sweet little pumpkin centerpiece.


I used the Mojo Monday sketch, opting for the square version as I am still circle phobic!  I used PTI's 2009 Autumn Tags to stamp the wreath image and sentiment, then colored the leaves with my Prismas.  See that cute, stamped background pattern?  It comes from a little set of $1 stamps by Studio G, found at Michaels.  It doesn't line up as easily as larger stamps, and the quality obviously isn't as good as more expensive versions, but for price it works for me!

Cardstock:  Stampin' Up! (Cajun Craze, More Mustard), Papertrey Ink (Vintage Cream)
Stamps:  Papertrey Ink (2009 Autumn Tags), Studio G (background stamps)
Ink:  Papertrey Ink (Dark Chocolate), Martha Stewart (Pumpkin), Versamark
Tools:  Papertrey Ink (Limitless Layers dies, Woodgrain impression plate), EK Success (border punch)
Accessories:  Queen & Co. (rhinestones), thread
Coloring medium:  Prismacolor Premier pencils, OMS

Here's how it was made:

1.  Cut square card base from Cajun Craze cardstock.  Cut a slightly smaller square from cream cardstock, impress with woodgrain pattern, and adhere to card base.
2.  Cut blocks from cream, Mustard, and Cajun cardstock.  Stamp background pattern in Versamark onto Mustard strip, then stamp in orange ink onto cream strip.  Punch bottom edge of Cajun strip.  Layer all three strips on card front, adhere, then stitch.
3.  Die cut or punch a 1.75 in circle from cream cardstock.  Stamp with image and sentiment.  Color image.  Die cut or punch a slightly larger scalloped circle from Cajun cardstock (I used PTI's Limitless Layers).  Adhere cream circle to Cajun circle, then attach the whole thing to the card front with foam adhesive.
4.  Embellish one corner with orange rhinestones.

That's it!  The finished product looks fairly simple, but it took me forever to come up with the right arrangement of colors and stamped patterns!

The Curtain Call Crew has samples to show you today, too, so make sure you stop by to see:


Jean Martin at Stampin' Scrapper
Julie Lacey at Stamps & Taxes
Laurel Seabrook at Seabrook Designs
Makiko Jones at MakInk Studio
Monika Davis at M.A.D. Stamper
Piali Biswas at Touch of Creation
Silke Ledlow at My Life
Stacey Schafer at Stacey's Stamping Stage
Teresa Kline at Enjoy the VA Sunshine


and October Guest Designer, Karen Thomas at Luv to Stamp.  (And be sure to give Karen some extra love this week, as it is her last week with us as a Guest Designer!)

...then play along with us and post your Curtain Call Color Challenge creation using Mr. Linky over at Stacey's Stamping Stage.

Thanks for stopping by, friends!

October 30, 2010

Halloween goody bags


Hi there!  I've been a busy bee this week, getting ready for our annual Halloween party.  I thought I'd share the goody bags I put together for the kids to take home.  I used PTI's Tiny Treats:  Halloween, and I just can't get over the cuteness of these little images!  

Cardstock:  Papertrey Ink (True Black, white), Bazzill (Tangerine)
Patterned paper:  American Crafts
Stamps:  Papertrey Ink (Tiny Treats:  Halloween)
Ink:  Inkadinkadoo (Black)
Tools:  Papertrey Ink (dies:  Tag Sale 1, Limitless Layers), Fiskars (hole punch)
Accessories:  Michaels (kraft bags, ribbon), baker's twine
Coloring medium:  Prismacolor Premier pencils, OMS

Here's how I made them:

1.  Die cut tags from orange and black cardstock.
2.  Cut strips of striped paper and adhere to the bottom of the tags.
3.  Die cut or punch 1.75 in circles from white cardstock.  Stamp with ledger lines, then image and sentiment.  Color image.
4.  Die cut or punch starburst circles from orange and black cardstock (I used PTI's Limitless Layers circle dies).  Adhere white circles to starburst circles, then adhere to tags.
5.  Punch 1/4 in holes in top of kraft treat bags.  Thread ribbon through tags and knot.  Thread baker's twine through tag and treat bags and tie in a bow.

To those of you celebrating Halloween, I hope you have a happy one!  Enjoy your weekend, and thanks for stopping by!

October 28, 2010

WMSC #20, Color Cue #9, & Paper Players #21


Hi friends!  After another round of family visitors, I finally had a chance to work on a couple of cards last night.  It was truly blissful, even though I didn't get much sleep!  Anyway, I combined three challenges for this one, including the Waltzingmouse sketch, the colors from the Color Cue, and the card "recipe" at The Paper Players, which calls for one patterned paper, a punched item, and a sentiment.

I needed to make a wedding card for a friend, and these colors seemed to fit the bill.  I've had this paper from American Crafts in my stash for months, so it was time to use it.

To make this card:
1.  Cut square card base from black cardstock.  Adhere square of patterned paper on top.
2.  Stamp chandelier in black onto white cardstock and heat emboss.  Mat on black cardstock with a punched bottom edge.
3.  Wrap black satin ribbon around bottom of main panel and adhere.  Attach pink satin bow.
4.  Stamp and heat emboss sentiment in black ink onto white cardstock.  Cut out using tag punch.  Punch a hole in one end of the tag and string with silver floss.  Thread floss through knot of pink bow and tie off.  Attach tag to panel with foam adhesive.
5.  Adhere main panel to card base with foam adhesive.  Embellish with black pearls.


Cardstock:  Papertrey Ink (True Black, white)
Patterned paper:  American Crafts
Stamps:  Prima (Cantaria), Papertrey Ink (Mega Mixed Messages)
Ink:  Clearsnap (Black)
Tools:  McGill (tag punch), Fiskars (hole punch), EK Success (border punch)
Accessories:  Papertrey Ink (Sweet Blush ribbon), Michaels (black ribbon), Queen & Co. (pearls), Stampendous (clear embossing powder), DMC floss

I decided to start listing the steps of how I make my cards instead of just rambling on about them.  That way you can skip right over it if you're not interested and still not miss any of the *important* stuff I have to say in the rest of the post!  And as always, I welcome your feedback, not just on my cards but on my blog content, so let me know what you think.

I hope you're having a fantastic day!  Thanks for stopping by!

October 26, 2010

ColourQ #56


Hey there, friends!  I haven't been posting much lately, but I hope to get back into the swing of things in another week or so.  There are just too many things demanding my attention these days, and usually not the things I would prefer to be doing!  

One challenge that I hope you will be able to find time for this week is the latest ColourQ Challenge!  Just check out this fabulous color combo and seasonal inspiration photo!

I also used a sketch at Everything but the Kitchen Sink, although I wasn't paying attention to the deadline when I decided to use it, so it has passed.  But it was a great challenge and fun to come up with a way to use it here.

For the main panel, I stamped an image from Inkadinkadoo in Garden Green classic ink and Spiced Marmalade Distress ink on white cardstock.  I wasn't happy with the pumpkin, so I stamped it again onto Pumpkin Pie cardstock, cut it out, and attached it with foam adhesive.  I did the same thing with the flowers, stamping with Versamark on Razzleberry cardstock, adhering, and adding a dot of white Enamel Accents for each flower center.  The sentiment is from PTI's 2009 Autumn Tags.

The background was made with alternating strips of Garden Green and Certainly Celery cardstock stamped with just the vines from the same pumpkin image using Versamark.  I machine stitched the panels for some texture, and because I am so happy to have my machine back after it was serviced!

Cardstock:  Stampin' Up! (Garden Green, Certainly Celery, Rich Razzleberry, Pumpkin Pie), Papertrey Ink (white)
Stamps:  Inkadinkadoo (Autumn Foliage), Papertrey Ink (2009 Autumn Tags)
Ink:  Stampin' Up! (Garden Green), Ranger Distress ink (Spiced Marmalade), Versamark
Accessories:  Ranger (Enamel Accents), thread

You won't want to miss out on the rest of the Royal Court creations this week!  Be sure to hop on over to ColourQ to check them out and leave the girls some love.  And don't forget to link up your project so we can be inspired by you, too!

Thanks so much for stopping by!  Have a great day!

October 24, 2010

Curtain Call Act 53 & FTL #113


Hi folks!  Can it really be Sunday again already?!  The last week just flew by while my parents were visiting, and now I'm struggling to get back into the swing of things and find my mojo!  Lucky for me, Stacey picked a fab Halloween inspiration photo and colors for this week's Curtain Call Color Challenge!  I immediately thought of my Tiny Treats:  Halloween set, and the Fall-to Layout for this week with three bitty squares was just the sketch I needed to get going.


I started by stamping the candy corn multiple times on two of the white cardstock squares.  I colored them with my Prismas and added some shadows for depth.  The third square has the cute treat bag image from this set, along with the sentiment "trick or treat".  I used a black pen to draw a simple frame.

The squares are matted on Basic Gray cardstock.  The Pumpkin Pie cardstock is de-bossed with the Polka Dot impression plate.  It still looked a little plain to me, so I added some black stars randomly inside some of the dots.  Hmmm.  I still feel like something is off or missing, but I can't quite put my finger on it.  Any thoughts?

Cardstock:  Stampin' Up! (Pumpkin Pie, Basic Black, Basic Gray), Papertrey Ink (white)
Stamps:  Papertrey Ink (Tiny Treats:  Halloween, Star Prints)
Ink:  Inkadinkadoo (Black)
Tools:  Papertrey Ink (Polka Dot impression plate)
Accessories:  Sakura (black pen), Prismacolor Premier pencils, OMS

What will you do with these colors?  I'd love to see!  You'll want to stop by and see the rest of the Curtain Call Crew for their sure-to-be fabulous takes on this week's challenge, too!


Jean Martin at Stampin' Scrapper
Julie Lacey at Stamps & Taxes
Laurel Seabrook at Seabrook Designs
Makiko Jones at MakInk Studio
Monika Davis at M.A.D. Stamper
Piali Biswas at Touch of Creation
Silke Ledlow at My Life
Stacey Schafer at Stacey's Stamping Stage
Teresa Kline at Enjoy the VA Sunshine


and October Guest Designer, Karen Thomas at Luv to Stamp.

And don't forget to play along with us and post your Curtain Call Color Challenge creation using Mr. Linky over at Stacey's Stamping Stage.

Thanks for stopping by, friends!  Have a happy Sunday!

October 22, 2010

CTD #115 & SSSC #89


Happy Friday, friends!  I finally had some more time to get inky today, and I really needed it after a long week!  I decided to play with the colors of the Color Throwdown and Karen's Sweet Sunday Sketch.


What a fun combo!  I've been lacking mojo lately, so I've been turning this one over in my brain for days and finally came up with something I'm happy with.  I used Teeny Trees and Vintage Labels 3 from Waltzingmouse stamps, the new Distressed Dots patterned paper from PTI (love!), and the Woodgrain impression plate.

Cardstock:  Papertrey Ink (Fine Linen, Rustic Cream, Lemon Tart), Stampin' Up! (Perfect Plum)
Patterned paper:  Papertrey Ink (Distressed Dots)
Stamps:  Waltzingmouse (Teeny Trees, Vintage Labels 3)
Ink:  Papertrey Ink (Dark Chocolate), Clearsnap (Terracotta), Stampin' Up! (Perfect Plum)
Tools:  Spellbinders (Labels 3), EK Success (border punch), Papertrey Ink (Woodgrain impression plate)
Accessories:  Papertrey Ink (buttons, jute twine)

Here's a peek at the inside:


Sorry to make this short!  I hope you have a great start to your weekend.  Thanks for stopping by!

October 20, 2010

Embellish Magazine Challenge & Paper Players 20


Hi friends!  I'm so glad to be back.  Luckily for me, jury duty was over before it started, so I found some time today for the current Embellish Magazine Color Challenge using felt.  I also used the sketch at The Paper Players.


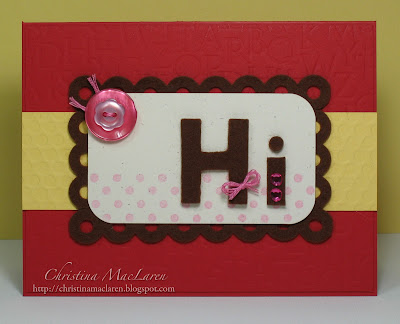
I was inspired by a card by Lindsay to try my hand at a clean and graphic style, and I thought these colors would work well for what I had in mind.  I covered some chipboard letters with Dark Chocolate felt and embellished them with pink gems and floss.  I also used PTI's eyelet border die to cut some strips of felt to make a scalloped border around the main panel.

I used PTI's Book Print and Polka Dot impression plates to add some interest to the Pure Poppy base and the Harvest Gold strip.  Not my usual style, for sure, but it's always fun to try something different!

Cardstock:  Papertrey Ink (Pure Poppy, Harvest Gold, Rustic Cream)
Stamps:  Papertrey Ink (Polka Dot Basics)
Ink:  Studio G (pink)
Tools:  Papertrey Ink (eyelet border die, Book Print impression plate, Polka Dots impression plate), EK Success (corner rounder)
Accessories:  Papertrey Ink (felt), EK Success (chipboard letters), Me & My Big Ideas (rhinestones), buttons, floss

Thanks so much for stopping by today!  

October 19, 2010

ColourQ 55 & Card Patterns 86


Good morning!  Are you ready for another ColourQ Challenge?  This week Arielle has TWO color combos to choose from, including this fabulous group of pink, black and vanilla in honor of Breast Cancer Awareness.  These rain boots are seriously cute, no?

I used this week's sketch at Card Patterns to create this sweet little card of encouragement, which will be just perfect for a friend of mine who is going through a rough patch at the moment.  This fabulous sentiment is by Unity, from the Quote Bundle Pack.  I most definitely have a thing for butterflies, especially the symbolism of metamorphosis and the beauty in being able to reinvent yourself when you enter a new stage of your life.

The sentiment is heat embossed with a clear sparkle embossing powder, and I placed pink gems over three clusters of dots that were a part of the stamped image.  I used an aqua brush to pick up some Pink Pirouette craft ink to fill in the small butterfly.  The large butterfly die and stamp are from PTI, and the patterned paper is by Making Memories.

Cardstock:  Stampin' Up! (Basic Black, Pretty in Pink, Very Vanilla)
Patterned paper:  Making Memories
Stamps:  Unity (Quote Bundle Pack), Papertrey Ink (Butterfly Dreams)
Ink:  Clearsnap (Black), Stampin' Up! (Pink Pirouette)
Tools:  Spellbinders (Labels 4 die), Papertrey Ink (butterfly die)
Accessories:  Me & My Big Ideas (rhinestones), JoAnn (embossing powder), ribbon


I'd love to see what you create with one of Arielle's fab color combos this week!  Don't forget to check out the wonderful eye candy the Royal Court Design Team has cooked up this week, and go by to leave them some love!

Thanks for stopping by today!  I will be catching up with my blog hopping and comments as soon as I'm done with jury duty, hopefully sooner rather than later.  Have a great day, friends!

October 17, 2010

Curtain Call Act 52 & FTL #112


Hello!  Are you ready for another round of the Curtain Call Color Challenge?  This week Stacey has a fun color combo and photo to inspire you.  I paired it up with the latest fall-to layout at clean & simple stamping.


I was inspired by the orange and white pattern in the photo with the beautiful turquoise ribbon.  I don't have any Tangerine ink (or anything remotely close), so I decided to stamp a pattern using white ink on Tangerine Tango cardstock.  The stamps are from PTI's Guide Lines Two, and I heat embossed the pattern with clear detail powder.  The sentiment is from Fillable Frames #4.

For the focal point, I die cut several layers of cream felt with PTI's Beautiful Blooms dies.  I don't have any Bermuda Bay, so I substituted PTI's Hawaiian Shores grosgrain ribbon.  What a fun pop of color!

Cardstock:  Stampin' Up! (Chocolate Chip, Tangerine Tango, Whisper White)
Stamps:  Papertrey Ink (Guide Lines Two, Fillable Frames #4)
Ink:  Clearsnap (Frost White), Papertrey Ink (Dark Chocolate)
Tools:  EK Success (corner rounder), Papertrey Ink (Beautiful Blooms dies)
Accessories:  Papertrey Ink (felt, button, ribbon), Stampendous (clear embossing powder), DMC floss

The Curtain Call Crew has samples to show you today, too, so make sure you stop by to see:


Jean Martin at Stampin' Scrapper
Julie Lacey at Stamps & Taxes
Laurel Seabrook at Seabrook Designs
Makiko Jones at MakInk Studio
Monika Davis at M.A.D. Stamper
Piali Biswas at Touch of Creation
Silke Ledlow at My Life
Stacey Schafer at Stacey's Stamping Stage
Teresa Kline at Enjoy the VA Sunshine


and October Guest Designer, Karen Thomas at Luv to Stamp.

...then play along with us and post your Curtain Call Color Challenge creation using Mr. Linky over at Stacey's Stamping Stage.

I'm looking forward to another fabulous week of your creations!  Thanks for dropping in, and for all of your comments!

October 16, 2010

2 Sketches 4 You #63


Hey there, friends!  I hope you're having a great weekend so far!  My parents arrived this morning and will be here for a week, plus I have jury duty starting Tuesday, so I don't know how much stamping and blogging I will get to do in the days ahead.  But I was determined to whip up a quick card this morning for Kazan's super sketch at 2S4Y.  I love how you could interpret the horizontal stripes in so many ways.


I needed a masculine thank you note to send to my brother, so I decided to use this fun sentiment from PTI's Signature Greetings with a single stamp I bought a while back from Imaginisce.  I couldn't resist the drum set, as my hubby plays and has inspired my kids to do the same from time to time!  I stamped it with Versamark onto a kraft circle cut out with a Nestie, then stamped the sentiment on top with PTI's Enchanted Evening ink.

For the sketch's horizontal stripes, I pulled out PTI's Library Ledger paper.  You can barely see it, but I stamped a few rows of A Little Argyle with Enchanted Evening ink onto the EE cardstock, so it just barely peeks out above and below the dp.  In hindsight I wish I had used the solid argyle image instead of the outline, but it adds just a little something extra.  For finishing details, I added paper piercing to circle, a few buttons, and some wrapped twine.

Cardstock:  Bazzill (kraft), Papertrey Ink (Enchanted Evening)
Patterned paper:  Papertrey Ink (Library Ledger)
Stamps:  Imaginisce (Drums), Papertrey Ink (Signature Greetings, A Little Argyle)
Ink:  Papertrey Ink (Enchanted Evening, Chai tea dye), Versamark
Tools:  Spellbinders (circle die), Papertrey Ink (Linen & Canvas impression plate)
Accessories:  Papertrey Ink (buttons, jute twine)

Okay, that's it for me today!  I'm off to visit with family.  I hope you have some fun and relaxation planned for the weekend!  Thanks for stopping by today!

October 14, 2010

WMSC #18 & Paper Players #19


Hello!  My post is a little late today, but hopefully in time for the latest Waltzingmouse Sketch Challenge.  I received some happy mail yesterday with my first order of Waltzingmouse stamps, so I couldn't wait to try them out!  I also used the colors of a new-to-me challenge, the Paper Players, which I found through my blogging buddy and guest DT member Nance.


I was inspired by the photo at Paper Players to create a winter scene , and I thought it would be fun to stamp the Teeny Trees in red and black for a bold and whimsical look.  It's a very different look for me, and I kind of like it!

I stamped one of the trees three times, cutting out two of the trees to layer over the first.  The circle ornaments on the trees are from a single stamp, so they were easy to add.  I sprinkled them with a tiny bit of glitter and added Glossy Accents for shine.

To create a snowy scene, I cut two hills from white cardstock and added glitter along the top edges using a two-way glue pen.  I used foam adhesive on one hill and tree to add some dimension.

Cardstock:  Papertrey Ink (Pure Poppy, True Black, white)
Stamps:  Waltzingmouse (Teeny Trees)
Ink:  Clearsnap (Cranberry), Inkadinkadoo (Black)
Tools:  Fiskars (hole punch)
Accessories:  Ranger (Glossy Accents), Jo-Ann (clear glitter), Me & My Big Ideas (rhinestones), Michaels (ribbon)

And a peek at the inside:


Thanks for stopping by tonight, and for your fabulous comments!  They are truly appreciated!


October 13, 2010

FTL #111 & C4C58


Hi friends!  How's your week going so far?  I have a card to share for two challenges today.  First up is the Fall-to-Layout #111 at clean&simple.  I really like the versatility of this sketch.  This card also qualifies for C4C58 at Crazy 4 Challenges, which calls for a birthday themed card this week.  And since I just found out that this week my blog friend Jean is celebrating a birthday, this one's for you girl!  (Enabling alert:  I used my new Verve stamps!)


I finally had a chance to use this big, beautiful flower from Verve's Dream Big set.  It seemed perfect for the C4C challenge since they are sponsored by Verve this week!  I stamped the smallest flower onto Vintage Cream cardstock and cut it out to layer over the larger one, and used some pearls for the flower center.

I masked the large flower and stamped two of the leaf images, then added a sentiment from a wood mounted stamp from Hampton Art.  My Stamp-a-ma-jig came in very handy when lining it up.

The background is Pure Poppy cardstock stamped in Vintage Cream with PTI's Background Basics:  Tin Types.  This is my favorite pattern from that set!

Cardstock:  Papertrey Ink (Dark Chocolate, Pure Poppy, Vintage Cream)
Stamps:  Verve (Dream Big), Papertrey Ink (Background Basics:  Tin Types), Hampton Art (sentiment)
Ink:  Clearsnap (Cranberry, Lettuce), Papertrey Ink (Dark Chocolate, Vintage Cream)
Accessories:  Papertrey Ink (ribbon), Michaels (pearls), thread

Another strip of the stamped Pure Poppy cardstock and some leaves finish off the inside of the card.


Make sure you go by and wish Jean a happy birthday!  She's having a giveaway on her blog to celebrate, so be sure to leave a comment on her post here for a chance to win.  Thanks for stopping by today!

Related Posts Plugin for WordPress, Blogger...