August 31, 2012

CAS-ual Fridays #68

Please scroll down for my 12 Kits of Christmas post!


Hello there!

Just zooming by with this week's new challenge at CAS-ual Fridays!  This week's theme is Top of the Class, and we want to see your clean and simple back to school creation.


We have another fantastic sponsor this week:  it's Pretty Paper Studio!  They've offered up a generous prize for our winner this week.  Thanks, Pretty Paper Studio!


There are lots of exciting announcements and teasers on the CAS-ual Fridays blog today, but you'll have to hop over there to read for yourself.  ;)  All I can say is that we have a fabulous new Girl Friday joining us this week, and I'm thrilled to have her on the team.  

My card is super easy and straight-forward, so I'll keep this brief.  :)

I stamped the pencil image from Paper Smooches' Smarty Pants repeatedly in Basic Gray ink, adding one in black ink and facing the opposite direction.  I colored it with Copics, added a stitched border, and put the panel on a red card base.  

The sentiment, also from Paper Smooches, was stamped onto a red banner, trimmed, and added with foam tape.

Cardstock:  Papertrey Ink (Pure Poppy), WPlus9 Design Studio (White)
Stamps:  Paper Smooches (Smarty Pants, Sentiment Sampler)
Ink:  Stampin' Up! (Basic Gray), Memento (Tuxedo Black), Copic markers
Tools:  Papertrey Ink (banner die)
Accessories:  thread

The Girl Fridays have lots of fun school-themed projects to get you going this week, so stop by to see what they've done!

Thanks for your visit today!

The 12 Kits of Christmas--August


It's time for the monthly installment of The 12 Kits of Christmas!  Our wonderful hostess this month is Kim, and she sent a beauty of a kit (photo courtesy of Kara):


This kit was full of gorgeous papers and trimmings as well as a lovely soft color palette.  I found myself going super clean and simple with my cards this month, but I look forward to revisiting this kit in the near future to make use of some of the other goodies Kim provided.

The first card is my favorite.  I have always liked aqua and pink for a non-traditional holiday color combo.  I wanted the card to convey a feeling of peace to go with the die cut word, so I simply heat embossed a poinsettia in white onto the card base, debossed it for subtle texture, then added the word and some spots of white Enamel Accents.

Cardstock:  Papertrey Ink (Aqua Mist, Sweet Blush)
Stamp:  Waltzingmouse (Big Bloom Poinsettia)
Ink:  Versamark
Tools:  Papertrey Ink (Linen & Canvas impression plate, Wonderful Words: Holiday die), corner rounder
Accessories:  Ranger (Enamel Accents), Filigree (embossing powder)

The next card uses one of the adorable digital images Kim sent.  I thought the petite size was perfect for a smaller 4 1/4 inch square card, and I love the pop of color against all of the white.

Cardstock:  WPlus9 Design Studio (White)
Digital Stamp:  Pink Petticoat
Ink:  Copic markers
Tools:  Sizzix (embossing folder), circle punch

My last card feels like it needs something, but I wanted the word to really stand out against this fantastic embossed snowflake background that Kim provided.

Cardstock:  Papertrey Ink (Sweet Blush, Autumn Rose, Vintage Cream)
Stamp:  Papertrey Ink (Signature Christmas)
Ink:  Stampin' Up! (Basic Gray)
Tools:  Papertrey Ink (Wonderful Words: Holiday die), Cuttlebug (embossing folder), paper piercer

That's all for now, but I will be playing more with this kit in the near future.  As always, I can't wait to see what the other gals have done:


Suzanne:  The Card Yard
Kara: KandRDesigns
Sharron: OnPapillionWings
Jeanne: AKeptLife

Thanks again for a wonderful kit, Kim!

August 24, 2012

CAS-ual Fridays #67--Banners & Flags


Another week has come and gone, can you believe it?  I hope my friends in the Northern Hemisphere are making the most of the last days of summer.  My little family has been busy trying to squeeze in as much fun as possible before school starts.  How about you?

It just wouldn't be the start of another weekend without a new CAS-ual Fridays challenge, of course.  :)  This week we want to see your clean and simple designs using banners and flags!


I never really jumped on the banner trend, though I love seeing them on other people's cards and layouts.  To get my creativity flowing, I did a quick search on Pinterest and came across this fantastic quilt:

Source: flickr.com via Christina on Pinterest
This design really spoke to me with its bright patterns on a crisp white background and perfectly stitched seams.  It was super easy to turn it into a card, too.

Using a banner die, I cut all of the banners from papers in the Fancy Pants Off to School collection.  The red banner was stamped with a paper clip from Paper Smooches Smarty Pants set.

All of the banners were adhered to a white panel that was debossed with the Linen & Canvas impression plate, as a nod to the fabric in the inspiration piece.  I stitched across the tops and added tiny bows on the edges.

With such a busy background, I didn't want a fussy sentiment treatment, so I simply punched a circle from lined paper, stamped a sentiment from Smarty Pants, and adhered it with foam tape.

Cardstock:  WPlus9 Design Studio (White)
Patterned paper:  Fancy Pants (Off to School)
Stamps:  Paper Smooches (Smarty Pants)
Ink:  Stampin' Up! (Chocolate Chip)
Tools:  Papertrey Ink (banner die, Linen & Canvas impression plate), EK Success (circle punch)
Accessories:  thread

The other Girl Fridays have even more fun and clever uses of banners and flags to share today, so stop by and leave them some love, too!  I can't wait to see your entry in the gallery!  :)

Thanks, as always, for your visit!  Have a fabby weekend!


August 20, 2012

Paper Smooches Giveaway Winner!

Hi folks!

Sorry to double post this, for those who have already seen it, but I have very poor access to the internet in my hotel, and in trying to edit this post earlier I managed to delete the entire thing.  Grrr.

Anyway, I had a comment/question about why the Random.org graphic only showed 1 to 100.  This happens every time I use Random.org and try to copy and paste the graphic into a blog post.  It defaults to 100, no matter what I do.  So, rest assured that I entered 1 to 168, and the winner was #114....

Tanja!


Tanja said...
WOW great cards - the sunset card is so effective - the embossing adds that special something. The pumpkin card has great colouring. I might have to visit your blog regularly!
Congratulations, Tanja!  Please email me at christinamaclaren at yahoo dot com with your mailing address and I will let Kim know where to send your prize.

Sorry again for the confusion, everyone.  Have a great night!

August 17, 2012

Something special to share--and a giveaway!

To see my CAS-ual Fridays post, please scroll down or click HERE!

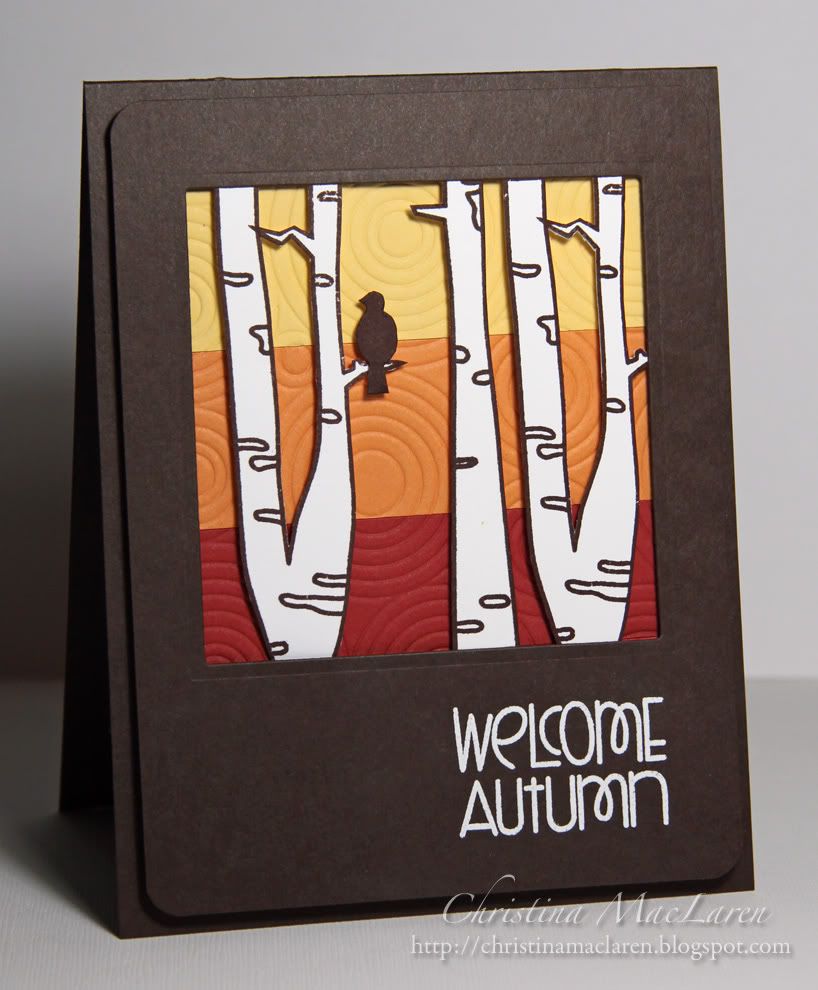
Hello friends!  I have some exciting news and two fun cards to share today.  Paper Smooches just released their newest set called "Autumn Groves" on August 15th, and I am here today to help promote this sweet set!  This is the tenth stamp set from their "Kismet collection".  You can find the new stamp set HERE.


I have one "Autumn Groves" stamp set to give away to one lucky person!  You have until midnight EST on August 19th to leave a comment on this post.  I will announce the winner here on Monday, August 20th.

For more chances to win, please visit:


I was smitten with this set from the moment I saw it!  I love the Fall, and the Autumn Groves set has captured everything I love about this season in Paper Smooches style!  

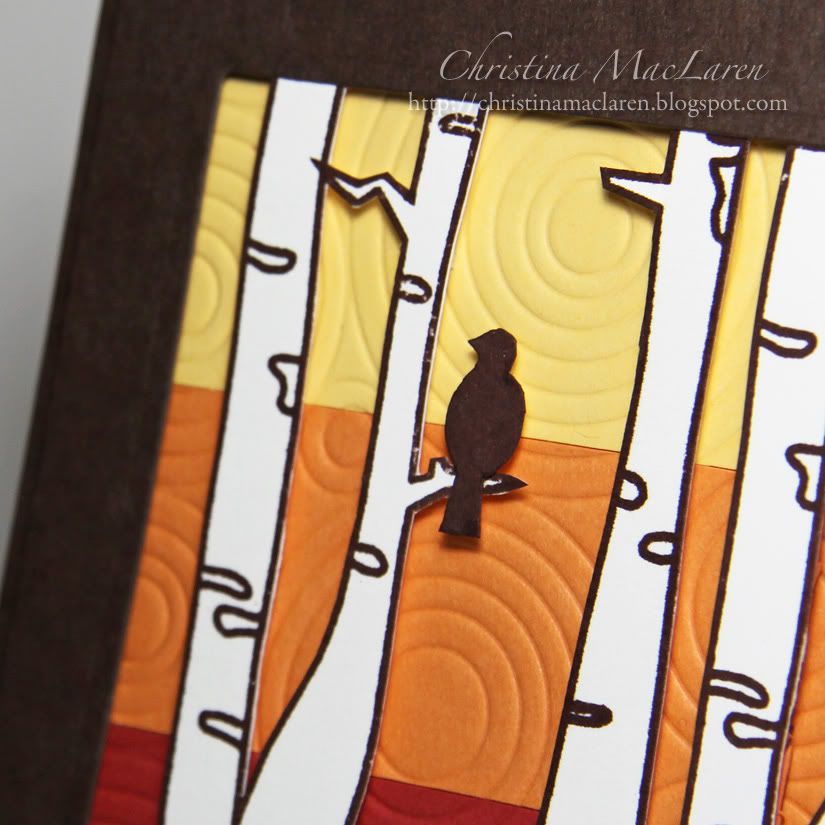
I knew that I wanted to work with the birch trees in this set first, so I created a sunset scene to highlight them.  I lined up strips of red, orange, and yellow cardstock and added texture with an impression plate, then popped up the birch trees and bird with foam dots.

I die cut a window in a panel of dark brown cardstock, heat embossed the sentiment in white, and rounded the corners before adhering it to the card base.


These trees were super easy to cut out.  They'd look great in so many scenes with other Paper Smooches characters, don't you think?

Cardstock:  Stampin' Up! (Early Espresso, Riding Hood Red, Peach Parfait, So Saffron), WPlus9 Design Studio (White)
Stamps:  Paper Smooches (Autumn Groves)
Ink:  Stampin' Up! (Early Espresso), Tsukineko (Versamark)
Tools:  Spellbinders (square die), Papertrey Ink (circle impression plate), corner rounder
Accessories:  Filigree (embossing powder)

I have one more card to share today, but there will be more in the near future!  I couldn't stop playing with this set.  :)

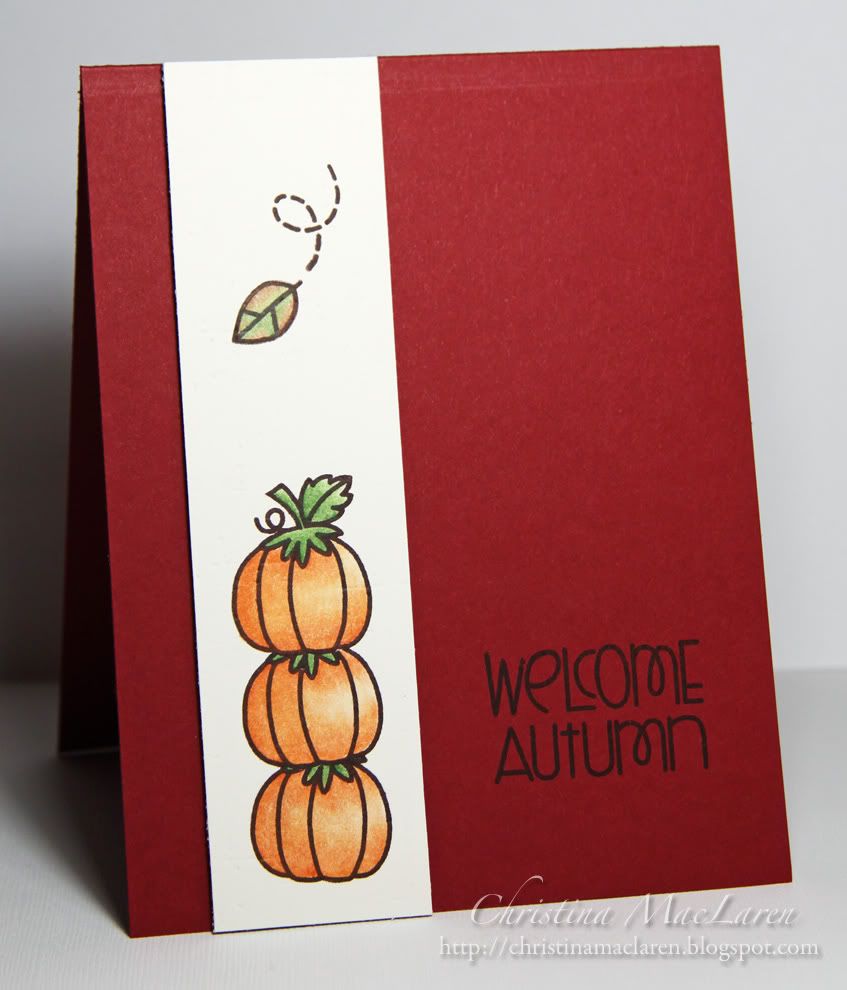
This simple card features the pumpkin from Autumn Groves, which I masked and stamped three times to make a little tower.  I added the falling leaf, then colored the images with my Prisma pencils.  I gave the strip some texture with an impression plate before adhering it to a red card base with foam dots.


I used the "Welcome Autumn" sentiment again on this card, because it is just so perfect.

Cardstock:  Stampin' Up! (Cherry Cobbler), Papertrey Ink (Vintage Cream)
Stamps:  Paper Smooches (Autumn Groves)
Ink:  Stampin' Up! (Early Espresso)
Tools:  Papertrey Ink (Linen & Canvas impression plate)
Coloring medium:  Prismacolor Premier pencils

Many thanks to Kim for inviting me to showcase this fantastic set today!  You will be seeing a lot more of it in the coming weeks.

Don't forget to leave a comment for a chance to win the Autumn Groves set!  I appreciate your visit today and hope you'll come back soon.  :)

Happy Friday!

CAS-ual Fridays #66--Splish Splash!


It's Friday!  Yippee!  Do you have any weekend plans?  We're heading up to Mt. Washington on Sunday and going to an amusement park to celebrate my daughter's 7th birthday, which was Wednesday.  I can't wait!

There's a super fun theme for this week's CAS-ual Fridays challenge--we want to see your clean and simple creations that have been inspired by the water!  Whether it's the ocean, pool, or pond, we hope you'll get your craft on and share your results with us this week.


Our sponsor this week, offering up a gift certificate to the winner, is Stop and Scrap!  Be sure to visit their online store, where you'll find loads of beautiful papers and accessories to feed your crafting addiction.
This is the first time I've had a chance to use the Guiding Light dies from WPlus9.  I used them to cut out the starfish and sand dollar from Peach Parfait cardstock, and I love the detail on the sand dollar in particular.

The large lighthouse image and stripes were heat embossed in white on a Marina Mist panel, which is framed by thin strips of Peach cardstock and mounted onto a white card base with foam dots.

Cardstock:  Stampin' Up! (Marina Mist, Peach Parfait), WPlus9 Design Studio (White)
Stamps:  WPlus9 Design Studio (Guiding Light), Papertrey Ink (Birthday Basics)
Ink:  Stampin' Up! (Marina Mist, Peach Parfait), Tsukineko (Versamark)
Tools:  WPlus9 Design Studio (Guiding Light dies), Papertrey Ink (banner die)
Accessories:  Filigree (embossing powder)

I really love how this turned out, and it's already on its way to my dad for his upcoming birthday.  :)

Hop on over to the CAS-ual Fridays blog to find out more about this week's challenge and prize, and to see what the rest of the Girl Fridays have cooked up!

Thanks for stopping by!  I'll be back with a special post in a few hours, so feel free to come back and check it out.  ;)

Enjoy your Friday!

August 10, 2012

CAS-ual Fridays #65--Square Cards


Ready for a new challenge at CAS-ual Fridays?  Of course you are.  :)  This week is easy peasy--create a clean and simple square card!


Many thanks to our sponsor, Stampotique Originals, for providing some wonderful stamps to the Girl Fridays to work with this week!  They've also offered up a gift certificate to our winner, so be sure to link up your card for a chance to win.

I love the birds on this Crow Line stamp, and I love how well they go with the sentiment even more.  I could definitely stand to rest my wings after the week I've had.  :)

I stamped the image across a kraft panel, then stamped it again on a scrap piece and cut out one of the birds to pop up with foam tape.  His friends are holding him up, after all.

Cardstock:  Papertrey Ink (Kraft)
Stamps:  Stampotique Originals (Crow Line, sentiment)
Ink:  Memento (Tuxedo Black)
Accessories:  The Ribbon Carousel (twine)

As always, there's fabulous inspiration to help you get started over on the CAS-ual Fridays blog.  Check it out!

Thanks for visiting again!  I hope to catch up on your blogs this weekend!

August 9, 2012

Cloud9 Blog Hop--August

If you're looking for the CASE Study Second Anniversary Blog Hop, click HERE!


What an amazing group of participants we had in the first Cloud9 Blog Hop!  I hope you had a chance to join us, but if not, you can jump right in with this month's challenge.  Just be sure to use at least one WPlus9 image in your creation, then link it up at the Cloud9 blog.

Suzanne has provided us with a fantastic sketch to use this month:


I was stumped for a while, but the "strips" in the sketch made me think of the banner image from Super Star, so that's where I started.  I also needed a little help choosing colors, so I turned to this week's ColourQ challenge (scroll down for the graphic).


I couldn't help it, I had to use A Pocketful again.  :)

I masked the banners before splattering Summer Starfruit ink across the card front, then added the sun and die cut pocket.

Cardstock:  Stampin' Up! (Midnight Muse), WPlus9 Design Studio (White)
Stamps:  WPlus9 Design Studio (Super Star, A Pocketful)
Ink:  Stampin' Up! (Midnight Muse, Summer Starfruit, Gumball Green, Certainly Celery)
Tools:  WPlus9 Design Studio (pocket die)

Here's the ColourQ palette for this week:


Don't forget to link up to the Cloud9 Blog Hop!  I can't wait to see all the brilliant takes on this sketch.

Thanks for stopping by!  Have a great day!

August 3, 2012

CAS-ual Fridays #64--On Cloud 9


Hooray for Friday!  Do you have any plans for the weekend?  My husband is taking the kids to Maine for the weekend to go boating with my father-in-law, so I'm planning to do a few painting projects around the house.  I'm looking forward to checking some things off of my to-do list!

If crafting is in your weekend plans, I hope you'll join in the latest challenge at CAS-ual Fridays!  It's the first challenge of the month, and that means our winner will be a future Guest Designer and win a gift certificate from Simon Says Stamp.  Yippee!


This week's challenge theme:  create a clean and simple project featuring something you'd find in the sky.

The first thing I thought of for this challenge was clouds, so I die cut two clouds from a debossed piece of white cardstock, then laid the negative piece onto a blue card base. 

Then I got stuck.  I wasn't sure what to do next, so I just started flipping through my stamp sets until I came to PTI's Postmarks and noticed the Air Mail stamp.  I thought it would be fun to use in a sky scene, so I stamped it in red inside one of the clouds.  

I added the "urgent" stamp to the smaller cloud, then used some dots from Harvest Berries to add darker blue accents.

The air mail strip and sentiment were stamped on a double ended banner, which I trimmed and popped up with foam dots.

All supplies from Papertrey Ink unless noted
Cardstock:  Spring Rain; White (WPlus9 Design Studio)
Stamps:  Postmarks, Harvest Berries
Ink:  Real Red, Pacific Point (Stampin' Up!), Tuxedo Black (Memento)
Tools:  cloud dies, banner die, circle impression plate, Linen & Canvas impression plate; Corner Chomper (We R Memory Keepers)

What do you see when you look up in the sky?  Show us on your clean and simple creation!  And don't forget to check out the rest of the inspiration from the Girl Friday team!

Thanks for visiting, friends!  Have a fantastic weekend!
Related Posts Plugin for WordPress, Blogger...