July 30, 2011

Just Us Girls #95--Use Fabric! & CAS-ual Fridays #13


Hello there!  I hope your weekend is off to a great start.  If you have plans to get crafty, I hope you'll play along with this week's Just Us Girls challenge!  This is my last week as a Guest Designer for JUGS, and I just want to say a huge thank you to the wonderful ladies on the JUGS team for having me this month!

This week Lisa has challenged us to use fabric on a project.  I love hoarding fabric almost as much as I love hoarding patterned paper, so this was a good excuse to use some of it!  There are lots of fun ways to use fabric on your card--you can stamp it, die cut it, ruffle it, use it as a background, or any other variation you can come up with!  Just get creative and have fun with it!

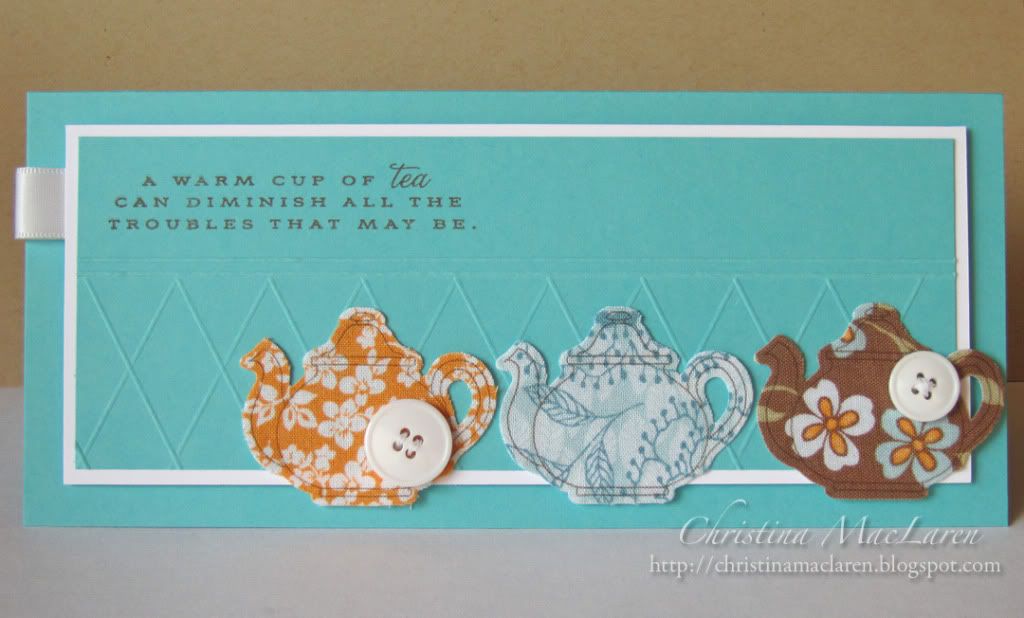
I'm also playing along with this week's CAS-ual Fridays challenge to make a long 4 X 9 card.  This is not something I do often, but it worked well for what I had in mind.


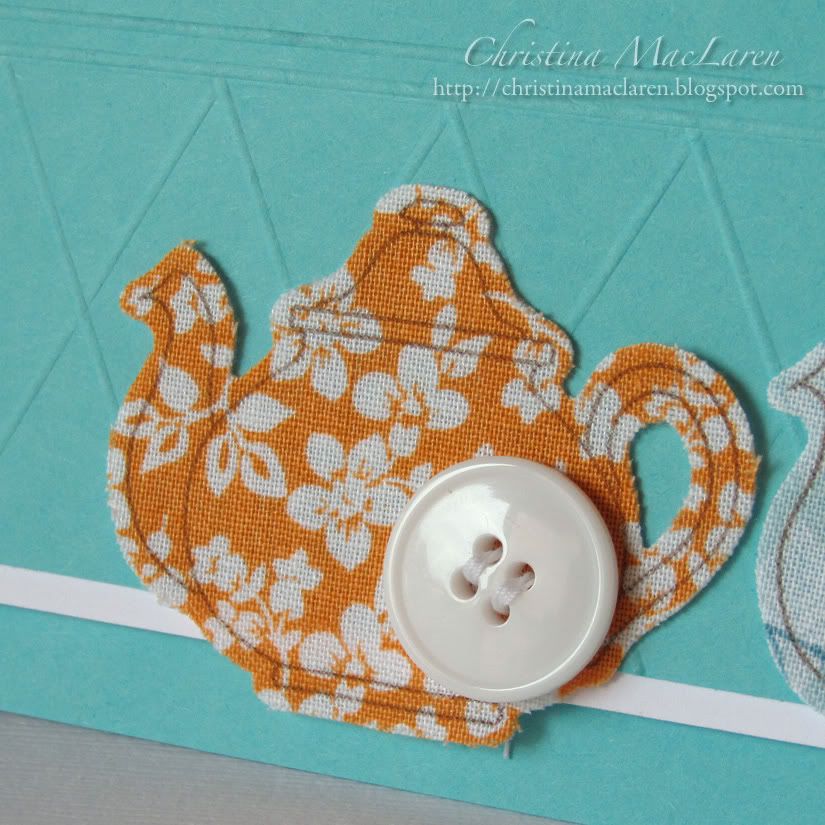
For my project, I decided to die cut and stamp three little teapots on coordinating fabric.  It helps to back the fabric with a fusible interfacing first to prevent fraying, but it's not absolutely necessary.  I dressed up a couple of the teapots with buttons and adhered them to a Hawaiian Shores panel scored with an argyle pattern.  The sentiment is from PTI's Tea for Two.

Cardstock:  Papertrey Ink (Hawaiian Shores, white)
Stamps:  Papertrey Ink (Tea for Two)
Ink:  Papertrey Ink (Dark Chocolate)
Tools:  Martha Stewart (Scoring Board), Papertrey Ink (teapot die)
Accessories:  fabric, buttons, ribbon, thread

I'm looking forward to seeing your creations with fabric!  Maybe it will inspire me to use up some more of my stash, or at least give me an excuse to buy more!  *giggle*

Thanks for your visit today!  Have a goodie!

July 28, 2011

Tuesday Trigger: Squares to Cherish


Hello there!  I'm back with a card I whipped up for the latest Tuesday Trigger challenge.  I went with a very literal interpretation of this beautiful crocheted afghan:


I am in love with the medallions in Papertrey's Iconic Images, and I knew they would make a fabulous "quilt".  I pulled colors from the afghan to stamp a patterned background which I then stitched for a quilted look.

For the focal point, I crocheted a simple granny square with embroidery floss and topped it with a button.  The sentiment is from PTI's Quilter's Sampler.  I'm looking forward to giving this card to a dear friend I will be staying with next week, especially since I taught her to crochet when our kids were babies.

All supplies from Papertrey Ink unless noted:
Cardstock:  Rustic Cream, Ocean Tides
Stamps:  Iconic Images, Quilter's Sampler
Ink:  Ocean Tides; Black, Lettuce, Dune (Clearsnap)
Tools:  Pinking shears (Fiskars)
Accessories:  button, DMC floss, thread

Thanks for coming by to take a peek at my card today!  Have a good one!

July 26, 2011

ColourQ #95


Good morning!  The summer is just flying by, don't you think?  But another Tuesday means a new ColourQ challenge, and this one is especially yummy.  Check it out:


I don't have the new In Colors from SU yet, so I subbed Pacific Point for Island Indigo and PTI's Berry Sorbet for Calypso Coral.  I still love how these colors look together!

I used the limited edition set Iconic Images from Papertrey Ink to stamp the bottom of the main panel with aqua medallions.  I added the silhouette with Pacific Point and one of the sentiments from the set in Espresso.

For a pop of coral, I hand cut a tiny flower from cardstock, added a pearl center, and adhered it to the silhouette.  I've seen a number of people use pearls and flowers to decorate stamped silhouettes, and I think it will be fun to play with different embellishments for this stamp.

I rounded one corner of the main panel and added two more pearls, then placed it on a mat of Pacific Point cardstock.  The card base is Early Espresso with a strip of Berry Sorbet to balance the coral flower.  I popped the main panel up on foam dots to give it a little bit of of dimension.

Cardstock:  Stampin' Up! (Early Espresso, Pacific Point), Papertrey Ink (Berry Sorbet, white)
Stamps:  Papertrey Ink (Iconic Images)
Ink:  Stampin' Up! (Pacific Point, Early Espresso), Clearsnap (Seaglass)
Tools:  We R Memory Keepers (Corner Chomper)
Accessories:  Michaels (pearls)

I do hope you'll play with us this week!  And if you don't have the new SU colors, you can still play along with what you have that's close.  We just want to see your creations!

Thanks for your visit today!  Have a happy Tuesday!

July 24, 2011

Stamp-a-faire fun photos!


Helloooo!  I'm back from my amazing weekend in Cincinnati at PTI's Stamp-a-faire retreat!  I don't want to taunt those of you who couldn't attend, but I thought I would share a few photos from our day.

This was the entrance to the ballroom where we stamped the day away and had the opportunity to view dozens of Design Team samples on display.  Let me tell you, their designs are even more incredible in person, and I thoroughly enjoyed seeing each and every detail up close!

(Sorry for the lighting--I forgot to turn off my flash!)


We each wrote our name and city on a little flag and put it on the map below.  Don't you just love it?!


Here I am with my two fabulous roomies from MA, Jessica and Suzanne.  These girls are the best!


And two more lovely ladies I was thrilled to meet, Lynn and Maureen!


I enjoyed a wonderful dinner at the Rock Bottom Brewery with this fun and talented group:  Lizzie, Sara, Jessica, Taheerah, Lynn, Maureen, Suzanne, and Chere.


The last event of the night was a dessert reception featuring tons of giveaways and time to mingle with the PTI Designers, including the one and only Nichole Heady.  She was incredibly sweet and gracious in person, and she made the evening raffles a ton a fun, even for those of us who didn't win.  *grin*


I just want to say to the PTI team that worked so hard to put the retreat together how amazing this weekend was for me, and how much I appreciate everything they did for us!  The whole thing ran so smoothly, and everyone was just incredibly professional, kind, and generous with their time.  

Finally, I want to say thank you to all of the fabulous women I had the chance to meet and chat with yesterday--meeting all of you was the best part of this whole weekend!  It was so exciting to be with a group of awesome gals who share my enthusiasm for stamping and totally "get" my obsession!

Thanks to you for stopping by tonight, friend!  I'll be back soon with something crafty!

July 23, 2011

JUGS #94--Gift bag

Patterned paper:  Colorbok
Stamps:  Papertrey Ink (Fillable Frames #11)
Ink:  Stampin' Up! (Melon Mambo)
Tools:  Papertrey Ink (Limitless Layers, Eyelet border, Delightful Dahlia dies)
Accessories:  Papertrey Ink (silk ribbon), felt, DMC floss, button

Hi there, friends!  By the time you read this, I will probably be on my way to Papertrey Ink's Stamp-a-faire!  Yippee!  I'll be sure to update you with some fun photos when it's all over.

Today is another fun challenge at Just Us Girls, and this week it's a 3D project.  The challenge is to embellish a gift bag--fun, right?!  You can use any products and any theme, so the sky's the limit!


I decided to make my own little bag out of patterned paper.  I found a tutorial on Pinterest and adapted it to make my bag 4 X 6 X 1.  I pinked the top of the bag and punched holes to thread some white silk ribbon through.

To decorate the front of the bag, I crocheted a flower and adhered it to a felt circle cut with PTI's Limitless Layers die.  I added two leaves cut with a die from Delightful Dahlia.

Behind the strip of blue patterned paper, I added eyelet borders cut from white felt.  Last, I added a sentiment from PTI's Fillable Frames #11.

Okay, I'm off to get some rest before the big PTI event!  Thanks so much for stopping by today, and I hope you'll play along with us this week at Just Us Girls!

July 20, 2011

Belated Play Date Cafe #90


Hi there!  I'm a little bummed to realize I missed the deadline for The Play Date Cafe Challenge.  It's so hard to keep your days straight on vacation!  Anyway, I thought I'd share it with you today.  I noticed that there was a wide range of interpretation for the "Fuschia" color in the gallery, but I went with a hot pink on my card.


I started with a Melon Mambo card base that I stamped all over with white ink using the leaves from Verve's Bloom & Grow.  I stamped another leaf image in Melon onto white cardstock, then cut it out by hand and adhered it over a white frame cut with two Labels 18 Nesties.  In the middle of the frame is a piece of Peach Parfait cardstock debossed with text.

I didn't bring any buttons with me on my trip *gasp!*, so I made my own with 5 layers of Concord Crush cardstock and Glossy Accents.

The sentiment is from PTI's Faux Ribbon.

Cardstock:  Stampin' Up! (Melon Mambo, Peach Parfait, Concord Crush), Papertrey Ink (white)
Stamps:  Verve (Bloom & Grow), Papertrey Ink (Faux Ribbon)
Ink:  Stampin' Up! (Melon Mambo), Clearsnap (Frost White)
Tools:  Spellbinders (Labels 18 dies), Papertrey Ink (Book Print impression plate, button dies)
Accessories:  Ranger (Glossy Accents), DMC floss

Thanks for dropping in today, friends!  Hope you're staying cool!

July 19, 2011

ColourQ #94


Good morning, friends!  Are you ready for a challenge?  Check out the bold color combo we are working with for this week's ColourQ:


Yikes!  This one had me pulling my hair out, but wait until you see the amazing DT samples this week. 

For my card, it started with the Beautiful Blooms II dies and stamps, which I used to make a layered flower in Tangerine and Daffodil.  I added two Simply Chartreuse leaves and a hand trimmed tag stamped with a sentiment from PTI's Tag-its #3.  The flower is adhered to a die cut doily and popped up on foam dots over a loop of Razzleberry grosgrain ribbon.

For the card base, I embossed a white cardstock panel with a Cuttlebug folder and adhered it to a Razzleberry card base.

Cardstock:  Stampin' Up! (Rich Razzleberry, Tangerine Tango, Daffodil Delight), Papertrey Ink (Simply Chartreuse, white)
Stamps:  Papertrey Ink (Beautiful Blooms II, Tag-its #3)
Ink:  Stampin' Up! (Rich Razzleberry, Tangerine Tango), Versarmark, Studio G (yellow)
Tools:  Papertrey Ink (flower & leaf dies, doily die), ProvoCraft (embossing folder)
Accessories:  Stampin' Up! (ribbon), button, DMC floss

I hope you'll play along with us this week!  I'm looking forward to seeing how everyone tackles this challenge.

Thanks for stopping by today!

July 18, 2011

Monday blues


Hello there!  I hope your week is off to a great start.  Despite the title, I don't have the blues on this Monday, but I do have a blue card to share with you!

This was a submission for a recent Paper Crafts call for cards using blue that didn't make the cut.  But I was totally smitten with how it turned out, so I'm happy to be able to share it with you here!

All cardstock is from Papertrey Ink:  Enchanted Evening, Blueberry Sky, and Spring Rain.  I cut the panels and mounted them on a white cardstock rectangle, then stamped the branch image from WPlus9's Woodgrain Silhouettes Additions using Versamark.  I heat embossed the image with clear powder to add some shine and subtle texture.

To finish it off, I stamped a sentiment from PTI's Healing Touch Sentiments with Enchanted Evening ink onto a double ended banner.  I trimmed one end, mounted the banner with foam tape, and added a button tied with floss.

Cardstock:  Papertrey Ink (Enchanted Evening, Blueberry Sky, Spring Rain, white)
Stamps:  WPlus9 Design Studio (Woodgrain Silhouettes Additions), Papertrey Ink (Healing Touch Sentiments)
Ink:  Papertrey Ink (Enchanted Evening), Versamark
Tools:  Papertrey Ink (Double ended banner die)
Accessories:  Papertrey Ink (button), DMC floss, Stampendous (embossing powder)

Thanks for joining me on this Monday!  Have a great one!

July 17, 2011

Mojo Monday #199


Hello friends!  I arrived in Indiana last night--thanks for all of your well wishes for safe travels!  I tried to get a little crafty this afternoon, but it was definitely hard to get into the groove in a different space with limited supplies.  Still, I wanted to play along with this week's Mojo Monday sketch:


Once again,  I pulled out Verve's Bloom & Grow.  I stamped the large circle of Rustic Cream cardstock with some of the leaves and a sentiment from the set, then added three small flowers.  Another flower was stamped and cut out by hand, then matted with a Raspberry Fizz scalloped circle.

I tried several different ribbon treatments, but nothing was working so I stuck with a simple strip of chocolate satin ribbon wrapped around the card front.  A die cut, Victorian Lace border balances the pink at the top of the card.

Cardstock:  Papertrey Ink (Dark Chocolate, Spring Moss, Raspberry Fizz, Rustic Cream)
Stamps:  Verve (Bloom & Grow)
Ink:  Stampin' Up! (Melon Mambo, Regal Rose), Clearsnap (Lettuce), Papertrey Ink (Dark Chocolate)
Tools:  Spellbinders (circle & scallop circle dies), Papertrey Ink (Woodgrain impression plate, Victorian Lace border die), We R Memory Keepers (Corner Chomper)
Accessories:  Michaels (ribbon)

Thanks for stopping by today!  I hope you've had a wonderful weekend!

July 16, 2011

JUGS #93


Hi there, strangers!  Sorry I've been quiet all week, but I'm currently on the road, traveling to Indiana to visit family, then headed to Cincinnati next weekend for Papertrey Ink's Stamp-a-faire!  Lots of fun stuff coming up!

This week at Just Us Girls brings a fabulous color challenge of coral, blush, and gray.  For more inspiration, check out the gorgeous graphic highlighting these colors:


Makes you want to go get your craft on, doesn't it?

For my card, I worked on it right after seeing THIS card by Nichole Heady, so I had those stitched cardstock strips on the brain and knew I had to incorporate them.  I started with a Smokey Shadow card base partially debossed with the sheet music impression plate.  I left a small strip for some Sweet Blush cardstock stamped with a sentiment from Verve's Accent Notes.

I stitched Berry Sorbet and Sweet Blush cardstock strips vertically, then topped them with a dahlia stamped onto Bitty Dots patterned paper and shaded with a Copic marker.  I added the large leaf, also from PTI's Delightful Dahlia, stamped on Sweet Blush cardstock.

Cardstock:  Papertrey Ink (Smokey Shadow, Berry Sorbet, Sweet Blush)
Patterned paper:  Papertrey Ink (2008 Bitty Dot Basics)
Stamps:  Papertrey Ink (Delightful Dahlia), Verve (Accent Notes)
Ink:  Inkadinkadoo (Black), Copic markers
Tools:  Papertrey Ink (Sheet Music impression plate, dahlia & leaf dies), We R Memory Keepers (Corner Chomper), Martha Stewart (Scoring Board)
Accessories:  Michaels (rhinestone), thread

I show you this close-up not to draw attention to my miserable coloring skills, but so you can see more of that yummy debossed music score!

Okay, friends, it's off to bed for me so that I don't drive off the road tomorrow on the last leg of my journey.  Thanks for dropping in, and I hope to be back around to visit your blogs in a couple of days!

July 12, 2011

ColourQ #93 & Simply Scrapping Crafts Embossing


Good morning!  It is already HOT here, and I'm not looking forward to another 90+ degree day with no A/C.  I hope you're staying cool wherever you are!

There is one thing to look forward to today--a new ColourQ challenge!  This week we have a bright and colorful palette inspired by a floral rug.  I'm also participating in a new-to-me challenge at Simply Scrapping Crafts, and the challenge this week is to use embossing.


I decided to use a recent favorite technique, color blocking!  I punched squares of red, pear, and peach, then stamped and heat embossed a white leaf image from WPlus9's Woodgrain Silhouettes Additions.  For the last square, I punched it from white cardstock and stamped the solid leaf image in Marina Mist.

I attached the color blocks to a white cardstock panel matted with Marina Mist.  I stamped a sentiment from WPlus9's Funky Foliage and added a popped up, stamped bird from Woodgrain Silhouettes Additions.  It's hard to see in the photo, but I scored two lines under the sentiment because it was looking a little empty.

The whole panel is popped up on a card base embossed with SU's Elegant Lines folder.

Cardstock:  Stampin' Up! (Marina Mist, Pear Pizazz, Peach Parfait), Papertrey Ink (white, Pure Poppy)
Stamps:  WPlus9 Design Studio (Woodgrain Silhouettes Additions, Funky Foliage)
Ink:  Stampin' Up! (Marina Mist), Versamark
Tools:  Stampin' Up! (Elegant Lines embossing folder), Martha Stewart (Scoring Board)
Accessories:  Stampendous (white embossing powder)

I'm looking forward to seeing your creations with this fun color palette!  Be sure to stop by and see the rest of the fabulous Design Team samples for inspiration.

Thanks for your visit today!  Have a great Tuesday!

July 10, 2011

CAS-ual Fridays #10 & Color Throwdown #149


Hi there, folks!  How's your weekend going so far?  We spent a lovely day at the beach with friends yesterday, so I feel somewhat rested and recharged.  Good thing, too, since I have lots to get done this week before leaving on a road trip!

I have a quick and easy card to share with you today.  This is the first time I've made a shaped card, inspired by the challenge at CAS-ual Fridays.  I also tackled this week's colors at the Color Throwdown, though I had to substitute Peach Parfait for Apricot Appeal.


I used Spellbinders' Blossom Nesties to cut a white cardstock base, then covered it with layers of Riding Hood Red and Peach Parfait.  Some of the layers are stamped with Versamark using PTI's Polka Dot Basics.  On two of the flower layers, I cut slits in between each petal and curled them up for dimension.

For the flower center, I die cut a Peach circle and stamped it with a sentiment from PTI's Tag-its #1, then added a few red gems.

The leaves are die cut and stamped with PTI's Delightful Dahlia and tucked in between the white card base and the first red layer.

Cardstock:  Stampin' Up! (Riding Hood Red, Peach Parfait, Wild Wasabi), Papertrey Ink (white)
Stamps:  Papertrey Ink (Polka Dot Basics, Delightful Dahlia, Tag-its #1)
Ink:  Versamark, Ranger (Fired Brick), Stampin' Up! (Wild Wasabi)
Tools:  Spellbinders (blossom, circle dies), Papertrey Ink (leaf die)
Accessories:  Me & My Big Ideas (rhinestones)

Thanks for stopping by today!  Have a good one!

July 9, 2011

JUGS #92 & CR84FN #33


Hello, friends!  I'm so glad to be back for another week as Guest Designer with Just Us Girls!  This week Kristin has challenged us with a fun technique--making cardstock buttons!  There's a great tutorial for this technique HERE.  I chose to use the challenge colors at CR84FN as well, with kraft as my neutral.

ETA:  Check out this wonderful tutorial by JUGS Designer Dana at Want2Scrap!


The idea for this card started with the buttons, which I made using Papertrey's button dies, although you can make yours with any shape of die or punch you want.  Each button has 5 layers of cardstock to give it a nice thickness.  On the top layer of white cardstock, I stamped an image from WPlus9's Mehndi Medallions.  I can't tell you how much I love how this turned out!  A coat of Glossy Accents and these babies look almost like the real thing!

For the rest of the card, I stamped images from WPlus9's Spring Post, including the letters L-O-V-E over the bird postage stamp.  

Cardstock:  Papertrey Ink (Kraft, Pure Poppy, white)
Stamps:  WPlus9 Design Studio (Spring Post, Mehndi Medallions)
Ink:  Clearsnap (Frost White, Cranberry), Stampin' Up! (Pretty in Pink)
Tools:  Papertrey Ink (button dies)
Accessories:  DMC floss

Another sweet card for my sweet hubby.  I don't think he'll mind the pink, do you?  *grin*

I hope you'll give this technique a try and share your creation with us at JUGS!

Thanks for stopping by!

July 8, 2011

Mojo Monday #198 & PDCC #89


Happy Friday, friends!  We're off to see the new Cars movie this afternoon, my son's first trip to the theater!  What do you have planned for the weekend?

Before I go, I wanted to pop in and share a card I made with the Mojo Monday sketch using the colors at The Play Date Cafe.  These were just the colors I needed for what I had in mind.


Patterned paper is from Cosmo Cricket's Everafter collection and the Neutrals DSP collection from Stampin' Up!.  I stamped flowers and leaves from Verve's Bloom and Grow set and cut them out by hand (although there are dies available, I don't have them yet).  I added a few brown pearls to the flower centers and popped them up on foam dots.

The sentiment is from the same set, stamped on a die cut Nesties Label 18 that is sponged with tea dye.  For the horizontal banners in the sketch, I die cut one banner from Vintage Cream cardstock and stamped it with text.  For the other strip, I die cut a Victorian Lace border from Certainly Celery cardstock.

I couldn't decide what to do with the vertical strip in the sketch, and nothing I tried there was working.  I finally decided to bend the rules a bit and add a pearl flourish, and I like how it turned out.  My only concern is that the design might be a little top-heavy, so I may go back and add a pearl flourish in the bottom right corner.  What do you think?

Cardstock:  Papertrey Ink (Vintage Cream), Stampin' Up! (Certainly Celery)
Patterned paper:  Cosmo Cricket (Everafter:  Something Old), Stampin' Up! (Neutrals DSP)
Stamps:  Verve (Bloom and Grow), Papertrey Ink (Background Basics:  Text Style)
Ink:  Stampin' Up! (So Saffron, Certainly Celery), Clearsnap (Parchment), Papertrey Ink (Dark Chocolate, Chamomile tea dye)
Tools:  Papertrey Ink (banner die, Victorian Lace border die), Spellbinders (Labels 18 die)
Accessories:  Michaels (pearls), thread

Thanks for stopping by and leaving some thoughts!  Hope you have a great day!

July 7, 2011

WMSC #54 & PDCC #88


Ahoy there, friends!  (Sorry, I couldn't help myself!)  I have a cute little card to share that I made for the Waltzingmouse Sketch Challenge.  I also used the colors of last week's Play Date Cafe challenge, but I missed the deadline to enter it.  Still, it was just the color combo I needed for this card.


As soon as I saw the sketch, I knew I wanted to make a card using the portholes from Half Pint Heroes.  I was inspired by the submarine included in this set to make the whole card look like the side of a sub, complete with fish swimming by!

I drew lines and dots by hand onto a Baja Breeze card base, then sponged the edges with Baja Breeze ink.  I stamped the portholes onto cardstock and cut them out, leaving a window in the center.  I adhered white cardstock behind the window, stamped two little faces and colored them with my Prisma pencils.  Then I popped the portholes up on foam dots.

The tiny fish is included in this set, as well.  I stamped it a few times on Poppy Parade and Daffodil Delight cardstock, cut them out and adhered them to the card.  

Finally, I stamped the sentiment onto a white cardstock strip, notched one end, added a fold, and adhered it with a foam dot to balance the other two raised elements.

Cardstock:  Stampin' Up! (Baja Breeze, Poppy Parade, Daffodil Delight), Papertrey Ink (white)
Stamps:  Waltzingmouse (Half Pint Heroes)
Ink:  Inkadinkadoo (Black), Stampin' Up! (Baja Breeze)
Coloring medium:  Prismacolor Premier pencils
Other:  Sakura (black pen)

Here's a look at the inside so you can see the cute little submarine in this set.


I can't believe I'm leaving for a road trip to Indiana in less than a week!  I'm trying to get some cards finished up before I leave, but with the kids home and wanting to play in the kiddie pool every day, I still have lots to do!

Thanks for dropping in today!  See you back here soon!
Related Posts Plugin for WordPress, Blogger...